Tag Archives: javascript

Practical GreenSock - Premium GreenSock Tutorials

Practical GreenSock Launch Date and Giveaway

After a long time in making, I am very excited to announce that the new lineup of my premium online courses will be available for purchase from the 18th of August 2020.

What is Practical GreenSock?

Practical GreenSock is a bundle of 3 online courses teaching you how to create more advanced animations and effects using GreenSock, ScrollTrigger and vanilla JavaScript.

All 3 courses are suitable for intermediate to advanced developers and designers.

Here is the breakdown of all 3 courses included in Practical GreenSock, watch the first unit from each of them to learn more.

  1. Projects Slider (*) – starter project – watch the first unit
  2. Pen Reveal (*) – starter project – watch the first unit
  3. Bella – main project – watch the first unit

* Free Upgrade for Existing Students

Anyone who has purchased at least one of my “closed” premium courses gets free access to Projects Slider and Pen Reveal from today.

Simply login to your account and start any of these two GSAP3 and ScrollTrigger courses today.

Enjoy this as a gift for all your support over the last few years. Thank you!

Enter to Win Practical GreenSock

To celebrate the re-launch of my premium courses I am also giving away 5 copies of Practical GreenSock.

Congratulations to the winners:

a Rafflecopter giveaway

Cheers
Petr

React and GreenSock Tutorial

React and Greensock Tutorial for Beginners

This React and Greensock Tutorial is focusing mainly on the basics of targeting elements and using React Hooks with GreenSock.

If you have been following my blog and YouTube channel for a while, you know that I enjoy using React and GreenSock.

They are both very powerful libraries with elegant APIs.

As more and more websites are build using React, it’s important to know how to use GreenSock in the React world.

What will you learn:

Baby steps I know, but lets learn how to walk before you try to run.

If you prefer learning by watching videos, checkout React + GreenSock 101.

View Demo →Download Files ↓

1. How to include GSAP in your React Project

React and Greensock Tutorial for Beginners

I am assuming you already know how to spin up a brand new React project using the Create React App.

npx create-react-app gsap-app
cd gsap-app

Now we can install GreenSock through npm and start the app.

npm i gsap
npm start

Cool, GSAP is installed lets import it to our App component.

import React from 'react';
import { gsap } from "gsap";

const App = () => {
    ...
    return (
        <div className="App">
            <header className="App-header">
                <img src={logo} className="App-logo" alt="logo" />
            </header>
        </div>
    )
}

2. How to target elements using refs

Firstly we need to get access to the element that we want to animate.

We can use useRef because our App component is a functional component.

import React, { useRef } from 'react';
import { gsap } from "gsap";

const App = () => {
    
    const headerRef = useRef(null);

    ...
    return (
        <div className="App">
            <header ref={headerRef} className="App-header">
                <img src={logo} className="App-logo" alt="logo" />
            </header>
        </div>
    )
}

We are storing a reference to our header element in the headerRef variable.

You can read more about React Refs in the official documentation.

3. How to animate React ref using GSAP

With our header “selected”, we can create a tween that will play when the component mounts.

import React, { useRef, useEffect } from 'react';
...

const App = () => {
    
    ...

    useEffect(() => {
        
        gsap.from(headerRef.current, {
            autoAlpha: 0, 
            ease: 'none',
            delay: 1
        });

    }, []);

    ...
}

Firstly we need to import useEffect and create our tween inside of it.

The empty array as a dependency of this effect will make sure that our tween runs only on the initial mount of this component.

If you are new to React Hooks you can check my free online course React 101.

The target for our .fromTo tween is headerRef.current that is how we can access the underlying DOM element.

Ok, now we have our header fading in with a slight delay, but how do we animate when the state of our component changes?

4. How to animate when React state changes

React and GreenSock Tutorial

Lets create a button that will change the background color of the header.

But we could that with css class, right? Off course we could, but I thought you are here to learn React + Greensock.

import React, { useRef, useEffect, useState } from 'react';
...

const App = () => {
    
    const [background, setBackground] = useState('#5a7d95');
    
    ...

    const toggleBackground = () => {
        const color = background !== '#5a7d95' ? '#5a7d95' : '#1b4943';
        setBackground(color);
    }

    useEffect(() => {

        gsap.to(headerRef.current, { 
            backgroundColor: background, 
            duration: 1,  
            ease: 'none' 
        });

    }, [background]);

    return (
        <div className="App">
            ...
            <button onClick={() => toggleBackground()}>Change background</button>
            ...
        </div>
    );
}

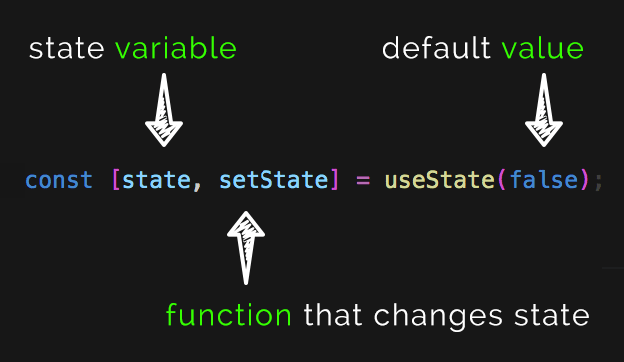
We import useState, set the default color and create a function toggleBackground that will toggle the background color between light and dark.

Then inside of a new useEffect that only listens to the background color change, we are using GreenSock’s .to tween to animate the background-color to the right value.

Please excuse my non-creative animations today, I am trying to keep the example as simple as possible.

5. How to create an array of refs

React and GreenSock Tutorial

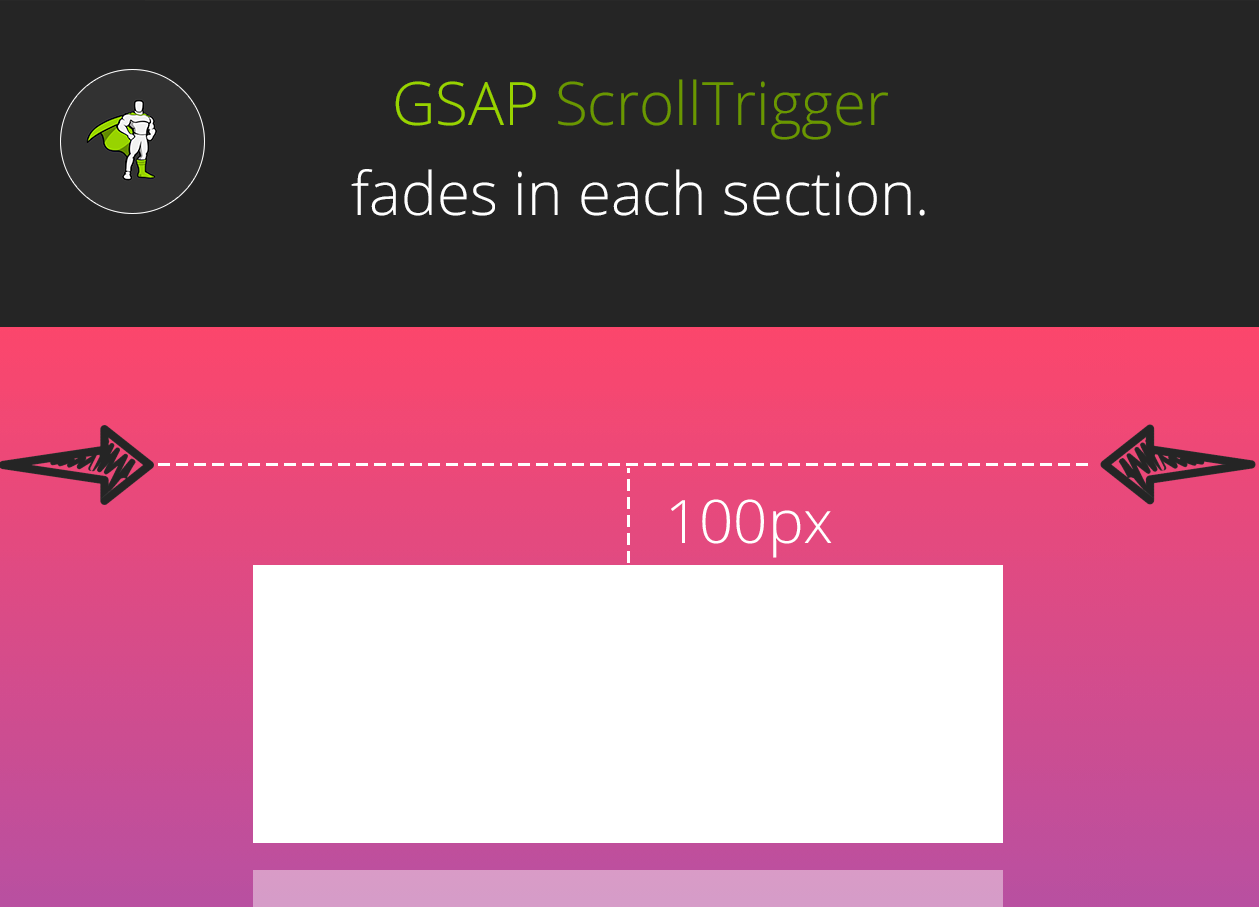
ScrollTrigger is the cool plugin from GreenSock that lets you trigger animations as the user scrolls through your page.

Let have a look how to include ScrollTrigger in your React project and fade in a few section.

import React, { useRef, useEffect, useState } from 'react';
import { ScrollTrigger } from 'gsap/ScrollTrigger';
gsap.registerPlugin(ScrollTrigger);

const sections = [
  {
    title: 'Title 1', 
    subtitle: 'Subtitle 1'
  },
  {
    title: 'Title 2', 
    subtitle: 'Subtitle 2'
  },
  {
    title: 'Title 3', 
    subtitle: 'Subtitle 3'
  }
];
...

We import ScrollTrigger and then register the plugin to make sure it survives the code tree shaking.

For this demo we are hardcoding some content in the sections array.

const App = () => {

    ...

    const revealRefs = useRef([]);
    revealRefs.current = [];

    const addToRefs = el => {
        if (el &amp;&amp; !revealRefs.current.includes(el)) {
            revealRefs.current.push(el);
        }
    };

    return (
        <div className="App">
            {
                sections.map(({title, subtitle}) => (
                    <div className="App-section" key={title} ref={addToRefs}>
                        <h2>{title}</h2>
                        <p>{subtitle}</p>
                    </div>
                ))
            }
        </div>
    );
}

Because we want to access multiple sections and trigger them individually, we need to create an array of refs revealRefs.

As you know from the above header example we get access to the underlying DOM elements in the .current property.

That is why we need to create a function addToRefs and add all our references to the sections to the revealRefs.current array.

6. How to use ScrollTrigger with React

Ok, great. We have access to all sections. Now lets loop over them and create new GSAP tween with scrollTrigger.

useEffect(() => {

    ...

    revealRefs.current.forEach((el, index) => {
        
        gsap.fromTo(el, {
            autoAlpha: 0
        }, {
            duration: 1, 
            autoAlpha: 1,
            ease: 'none',
            scrollTrigger: {
                id: `section-${index+1}`,
                trigger: el,
                start: 'top center+=100',
                toggleActions: 'play none none reverse'
            }
        });

    });

}, []);

We are looping over the revealRefs.current array and creating a simple .fromTo tween.

Each sections fades in when top of it is 100 pixels from the center of the viewport.

Again, today I could not think of a more creative way than just simply fading in a bunch of dummy sections.

React and GreenSock Tutorial Demo

View Demo →Download Files ↓

Do you want to learn more about React or GreenSock? Check out my free online courses React 101 and GreenSock 101.

Conclusion

Quite a long tutorial, but I hope that this guide will help you with implementing GreenSock in your React projects.

Do you have any questions related to GSAP and React? Let me know in the comments.

Barba.js Tutorial

Page Transitions Tutorial – Barba and GreenSock – Part 2

In the previous page transitions tutorial we have created a simple “take over” effect.

Today we will explore a little bit more about Barba.js and GreenSock and create a circular page transition.

Page Transitions Tutorial

What you will learn in this page transitions tutorial:

View Demo Download Files

Init Barba.js

The general setup of Barba.js is the same as in the previous tutorial.

barba.init({
    transitions: [{
        async leave({trigger}) {
            await loaderIn(trigger);
        },
        enter({next}) {
            loaderAway(next);
        }
    }]
})

We have two transitions leave() and enter(), but this time we are passing trigger to the loaderIn function and next to the loaderAway function.

How to scale up from where the user clicked

Page transitions tutorial

Each Barba.js hook receives the same data argument that contains the current and next page properties, it also includes trigger that is the link that triggered the transition.

You can read more about the Barba Hooks in the official documentation.

function loaderIn(trigger) {

    // get the size of the clicked trigger element
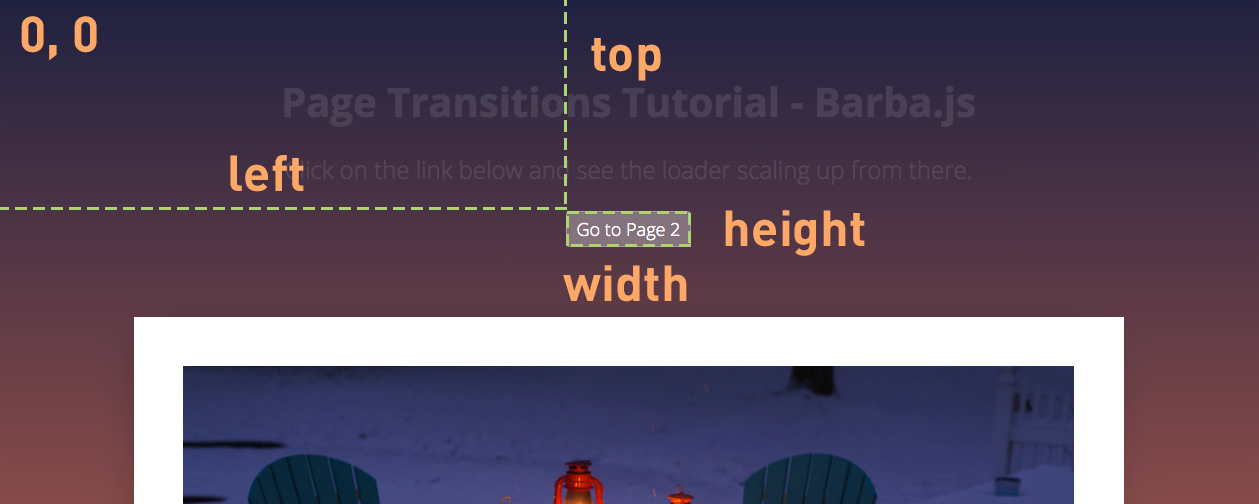
    const { height, width, top, left } = trigger.getBoundingClientRect();
    const triggerTop = Math.floor(top);
    const triggerLeft = Math.floor(left);
    const triggerWidth = Math.floor(width);
    const triggerHeight = Math.floor(height);

    // get viewport size, this will be used for scaling up the loader
    const viewportHeight = window.innerHeight;
    const viewportWidth = window.innerWidth;     
    const loaderSize = viewportHeight > viewportWidth ? viewportHeight*2 : viewportWidth*2;

    ...
}

We are firstly getting the dimensions of the trigger and its top and left offset relative to the viewport using the javascript getBoundingClientRect() method.

Secondly, we are getting the size of the viewport to be able to resize the loader accordingly.

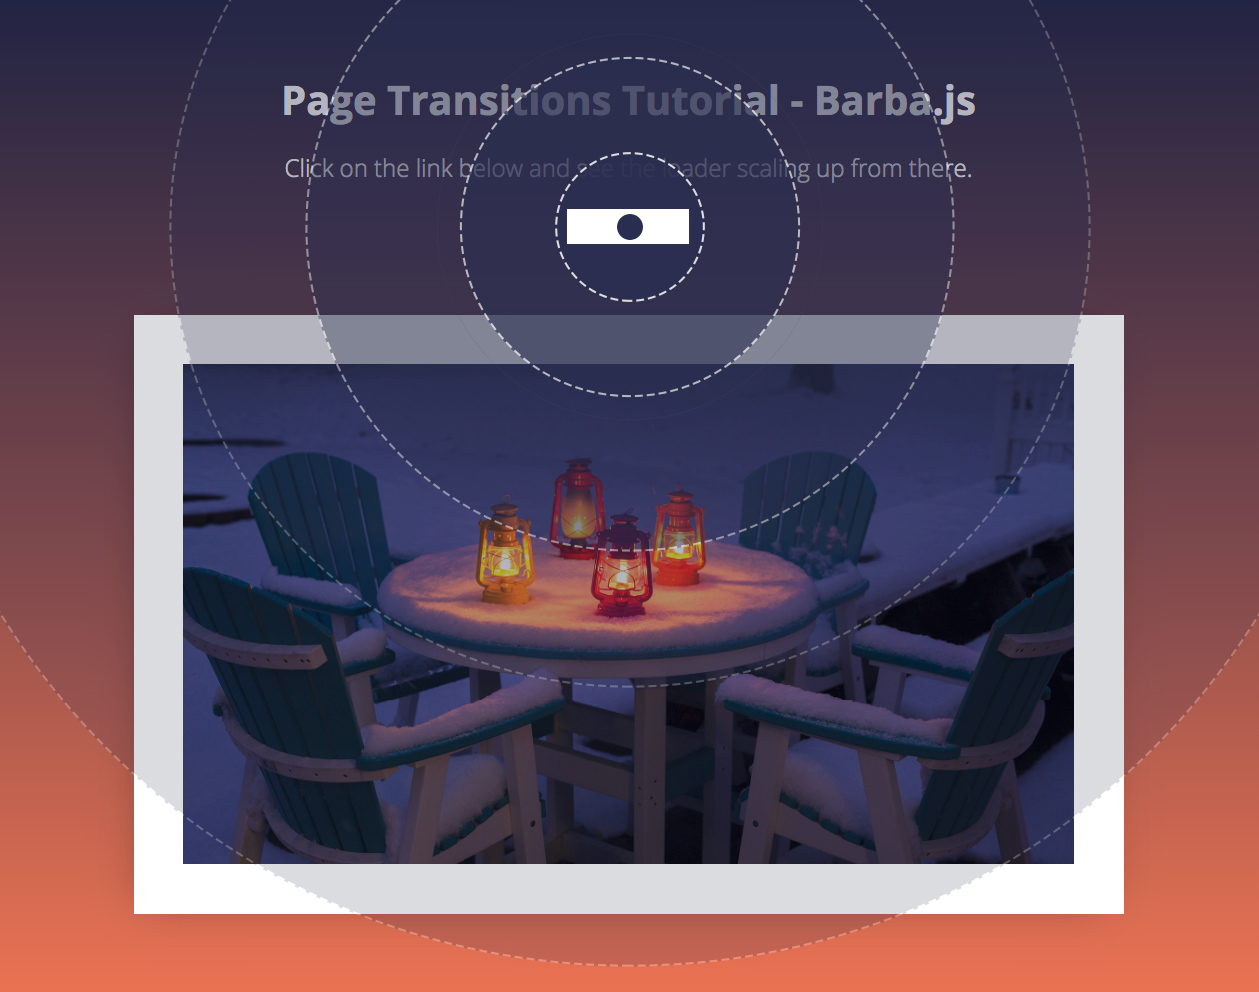
Because the loader will always scale up from the center of the clicked element we need to make sure it is twice the size of the viewport.

How to use GreenSock for page transitions

GreenSock timeline

Now we need to create a GreenSock timeline that will scale the loader up.

function loaderIn(trigger) {

    ...
    const tl = gsap.timeline();
    tl
        .set(loader, {
            autoAlpha: 1,
            x: triggerLeft + (triggerWidth/2),
            y: triggerTop + (triggerHeight/2),
            width: loaderSize,
            height: loaderSize,
            xPercent: -50,
            yPercent: -50
        })
        .fromTo(loader, 
        {
            scale: 0,
            transformOrigin: 'center center'
        },
        { 
            duration: 0.8,
            scale: 1, 
            ease: 'power4.out'
        });
    return tl;

}

Firstly we use the .set tween to set the right position of the loader and resize it according to the viewport.

We use xPercent: -50 and yPercent: -50 to center, the middle of the loader in the center of the clicked link.

The .fromTo tween scales the loader from 0 to 1.

Regardless of where the link is on the page, the loader will always scale up from there and cover the whole screen.

Still with me? Lets keep going.

If you are new to GreenSock, checkout out my GreenSock 101 online course.

How to change the body class on page transition

Now let’s try to change the body class and display the correct background colors as defined in the stylesheet.

.is-home { background: #1f213f; }
.is-page-2 { background: #1c323d; }

Remember Barba.js only replaces the content of the data-barba="container”. This means that the body class would stay the same when navigating between the pages.

We have to manually update it like this:

function loaderAway(next) {
    document.body.removeAttribute('class');
    document.body.classList.add(next.container.dataset.class);
    ...
}

We are passing the next page to the loaderAway(next) function.

Inside of it, we are firstly removing the class attribute from the body tag and then applying the class that we have defined on the incoming page container as data-class="is-page-2”.

This will make sure that the body class is updated before we reveal the incoming page.
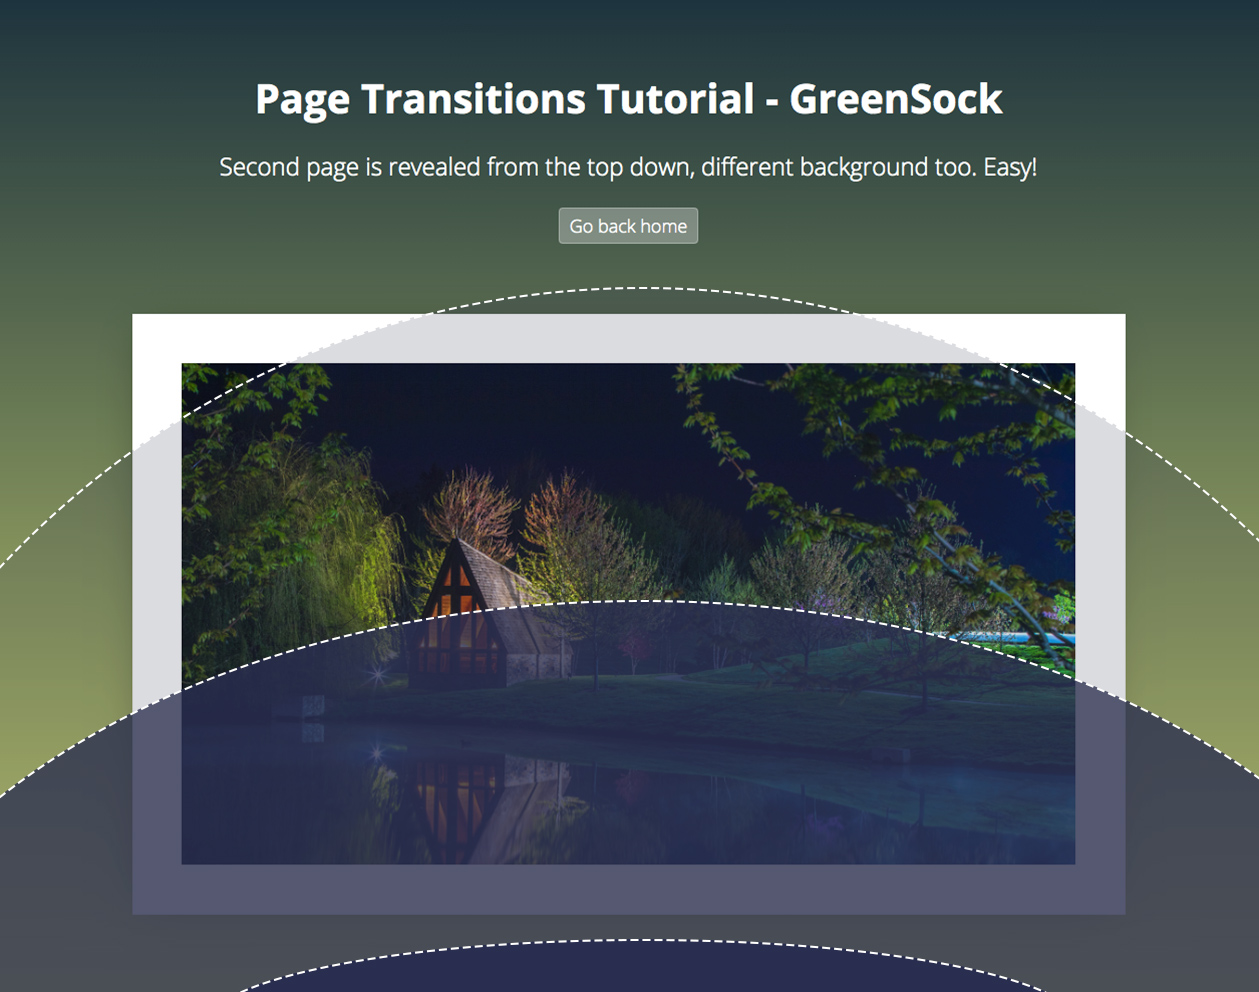
Reveal the new page

Page transitions tutorial

Now we have the whole page covered by the scaled-up loader, Barba updated the page under the loader and we are ready to reveal it.

The loader is a simple div, with a border-radius set to 100% to appear as a circle.

function loaderAway(next) {
    ...
    const h1 = next.container.querySelector('h1');
    const p = next.container.querySelectorAll('p');
    const img = next.container.querySelector('img');

    const tl = gsap.timeline();
    return tl.to(loader, { 
        duration: 1, 
        scaleX: 0.5, // squash the loader
        scaleY: 0.1, // squash the loader
        yPercent: 0, // move it down
        ease: 'power4.inOut'
    }).fromTo([h1, p, img], {
        autoAlpha: 0
    }, {
        duration: 0.9, 
        autoAlpha: 1, 
        stagger: 0.02, 
        ease: 'none'}, 
    0.3);
}

We can access the content of the incoming page by getting the right selectors from next.container.

Then we can reveal it in whatever fashion we want.

The .to tween above is squashing it down and moving it away from the viewport using the yPercent: 0.

With a slight 0.3s delay and a short stagger offset we are also fading the content in.

Final Demo

View Demo Download Files

Related Resources

Conclusion

And that is it, now you know how to create a circular page transition using Barba.js and GreenSock. If you are new to GreenSock, checkout GreenSock 101 where you can learn even more about this powerful animation library.

Have you seen any cool page transitions that you would like to see covered in my future page transitions tutorial?

Let me know in the comments.

React + GSAP Workshop

New Courses Survey

I am currently in the planning phase of my new premium courses. Please answer the following questions, so that I can create the ideal course for you.

React Hooks Tutorial for Beginners

React Hooks Tutorial for Beginners

Are you new to React Hooks or would you like to know how to use GreenSock with React?

Then you should definitely understand what React Hooks are and how to use them.

In this React Hooks tutorial will learn:

What are React Hooks?

In short React Hooks let you use state and side effects in a functional components, something what was not possible before.

Before React Hooks were introduced to the world, this would be your workflow:

  1. create a functional (stateless) component
  2. realise that you need to manage an internal state of this component
  3. rewrite this component into a class component
  4. happily manage components state

Now with React Hooks it looks much more streamlined:

  1. create a functional component
  2. happily manage components state

React Hooks let you manage the state and react to state changes in functional components.

You can read more about React Hooks from the official documentation.

Now lets explore the most common state management use cases in React components.

How to manage state with React Hooks?

Imagine that we have a simple React component that needs to be either collapsed or expanded.

import React from 'react';

const Collapsible = () => {
    return (
        <div className="isExpanded">
            <h1>Item title</h1>
            ...
        </div>
    )
}

We would need to rewrite this into a class component if there were no React Hooks.

Luckily we have useState React Hook.

import React, { useState } from 'react';

const Collapsible = () => {

    const [state, setState] = useState(false);

    return (
        <div className={state ? 'isExpanded' : null}>
            <h1>Item title</h1>
            ...
        </div>
    )
}

We are importing useState from React and then creating a default state with the value of false.

Then we have access to the state variable and can render a css class when required.

If we wanted our component to be expanded by default we would set it to true by default.

How to use useState React Hook

state and setState names are customisable names, you could call them whatever you like. color, setColor or user, setUser would do the same thing.

You get the point of sticking to a clear naming here.

state is the name of the stored variable and setState is a function that updates the value of this variable.

To change the value we could add onClick event to the h1 and toggle the value to the opposite true or false.

import React, { useState } from 'react';

const Collapsible = () => {

    const [state, setState] = useState(false);

    return (
        <div className={state ? 'isExpanded' : null}>
            <h1 onClick={() => setState(!state)}>Item title</h1>
            ...
        </div>
    )
}

Now we are managing the internal state of our component using the useState React Hook.

You are not limited to a single value for your state, you can store objects, arrays or even nested objects.

Here is an example of a property object being stored in the state.

const [property, setProperty] = useState({
    name: 'Hotel Heaven',
    id: 'hh123',
    location: 'Collins Street'
});

How to fetch data with React Hooks?

Another React Hook that you will need to master is useEffect().

It hooks into your React component in the same way as componentDidMount, componentDidUpdate, and componentWillUnmount used to.

Here is an example component that fetches Top board games from Board Game Geek.

import React, { useState, useEffect } from 'react';

const TopGames = () => {

    const [games, setGames] = useState([]);

    useEffect(() => {
        fetch("https://bgg-json.azurewebsites.net/hot")
            .then(response => response.json())
            .then(data => setGames(data));
    });

    return (
        <div>
            {
                games.map(game => <p>{game.title}</p>)
            }
        </div>
    )
}

We are importing useEffect React hook and then inside of it we are:

  • fetching data from an external API and
  • saving the response into a local state variable called games

The problem with the above code is that it would create an infinite loop!

The component mounts, we fetch data, the state gets updated, the components updates, we fetch data…and this continues.

By default useEffect() runs on the first render and on every update.

How to fix the infinite loop inside of useEffect

To make the fetch call only once, we need to supply an empty array as the second parameter.

useEffect(() => {
    fetch("https://bgg-json.azurewebsites.net/hot")
        .then(response => response.json())
        .then(data => setGames(data));
}, []);

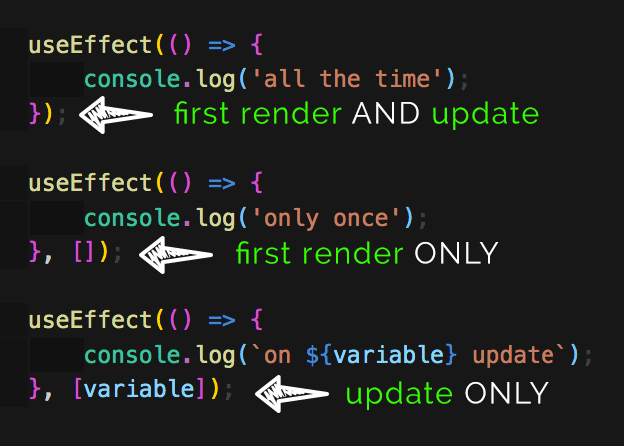
This empty array tells React to run the function inside of it only after the first render, not on update.

In another example we could include a searchTerm dependency. This would make sure that the fetch call only happens when the searchTerm variable is updated.

useEffect(() => {
    fetch(`https://someurl.com/api/${searchTerm}`)
        .then(response => response.json())
        .then(data => setGames(data));
}, [searchTerm]);

searchTerm is now a dependency for this side effect and unless searchTerm is updated, the fetch call would not run.

How to use useEffect React Hook

We have mentioned mount and update, but where is the componentWillUnmount()?

If your effect returns a function, it will be executed when it is a time for the component to be unmounted.

useEffect(() => {
    // do something here first
    // then console.log when unmouting
    return (() => {console.log('unmounting now')})
}, []);

This will simply console.log every-time this component gets removed from the DOM.

Conclusion

I hope that this article clarified a lot of your questions about React Hooks.

They are a great addition to the React API, make your code more readable and reusable.

I am currently re-recording my React 101 to include React Hooks, join me there to learn more.

Are you struggling with anything related to React Hooks? Have you tried to use GreenSock with React? Let me know in the comments.

GreenSock Snippets for VSCode

GreenSock Snippets for VSCode

Greensock Snippets for VSCode are now available for you to instal.

If you are like me, you want to have VSCode snippets extension for every language that you use.

This saves you time typing, speeds up your workflow and prevents you from making unnecessary syntax errors.

If you are keen on GreenSock Animation Platform you can now enjoy brand new GreenSock Snippets for VSCode.

What you will get

GreenSock Snippets for VSCode

Autocompletion for .to, .from, .fromTo, .set, import and timeline syntax.

Install GSAP Snippets

Let me know in the comments if I have missed some other snippets that should be also included.

The source code is on Github, feel free to contribute to it

Git config tutorial

Git Config Tutorial

Have you ever wanted to change the default commit message in Git config?

In this Git config tutorial you will learn:

If you are completely new to Git checkout out the Git Tutorial for Beginners or my complete Git tutorials playlist on Youtube.

Where do you find the Git config files?

The following Git config files locations are Mac specific.

System vs Global vs Local Git config

Before we get to the locations, I just want to clarify that there are 3 different scopes for Git config.

System Git config controls settings for all users and all repositories on your computer.

Global Git config controls settings for the currently logged in user and all his repositories.

Local Git config controls settings for a specific repository.

These 3 config files are executed in a cascading order. First the system, then global and finally the local.

That means that your local Git config will always overwrite settings set in the Global or System configs.

Git config tutorial

// System
/usr/local/git/etc

// Global
$home/.gitconfig

// Local
.git/config

In general you most likely want to edit the Global settings and occasionally set some more specific configuration for a single repositories.

Your username and email should be the same for all your repos, that is why it is stored in the Global config.

How do you view your Git config settings?

git config --list
git config --list --system
git config --list --global
git config --list --local

If you don’t specify which of the configs you would like to see, you will get all 3 configs merged into the output in your console.

To edit any of the files use the --edit flag or open the file in a text editor.

How to add or delete a record from Git config?

The following commands would add or remove your name and email from the Global config.

// to add
git config --global user.name "Your Name"
git config --global user.email "[email protected]"

// to remove
git config --global --unset user.name
git config --global --unset user.email

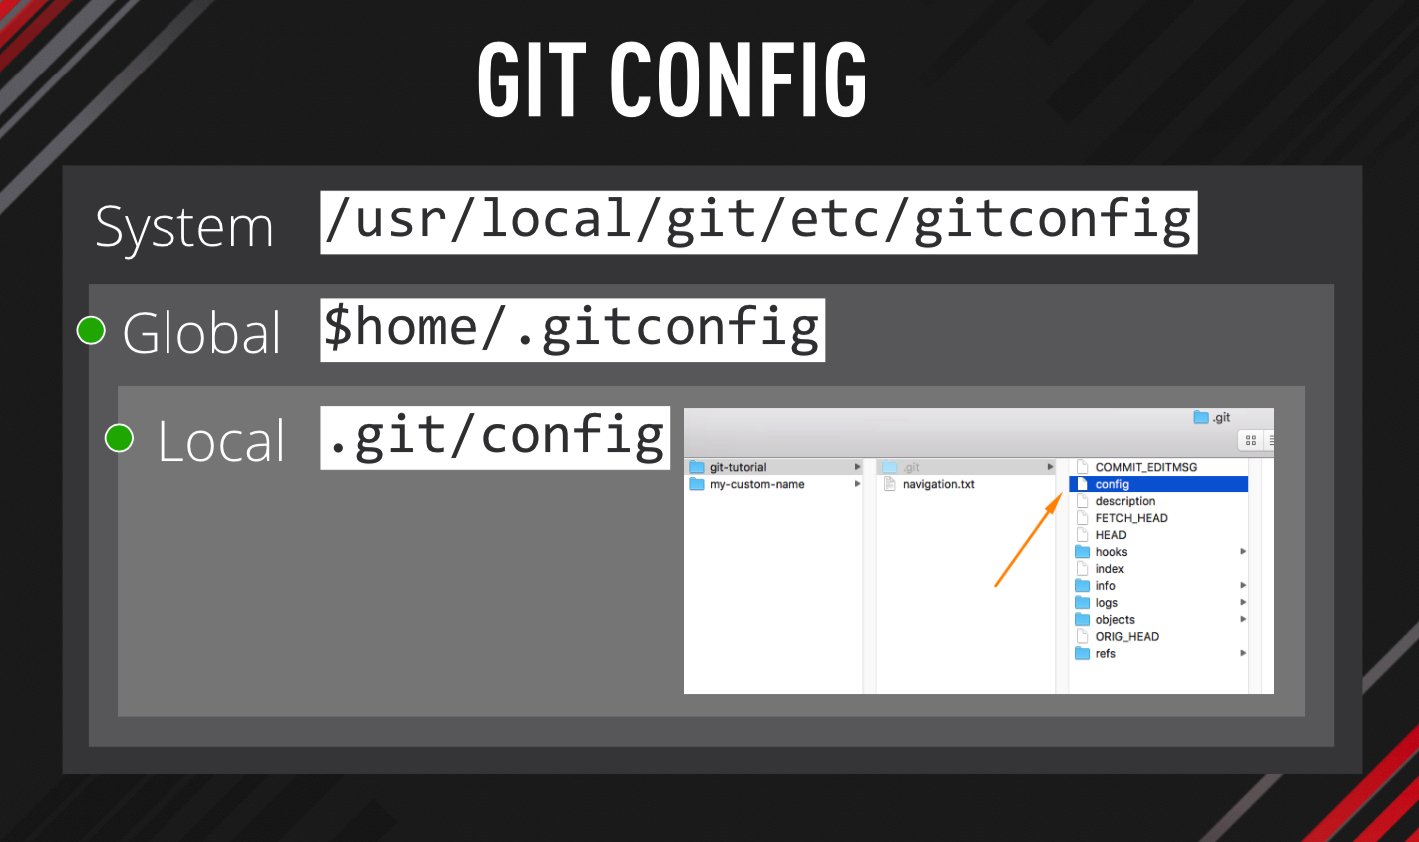
If you want to read a specific record from Git config use: git config user.name.

How to create a custom Git commit message?

Sometimes it is useful to create a template for your commit messages. This keeps your commits consistent.

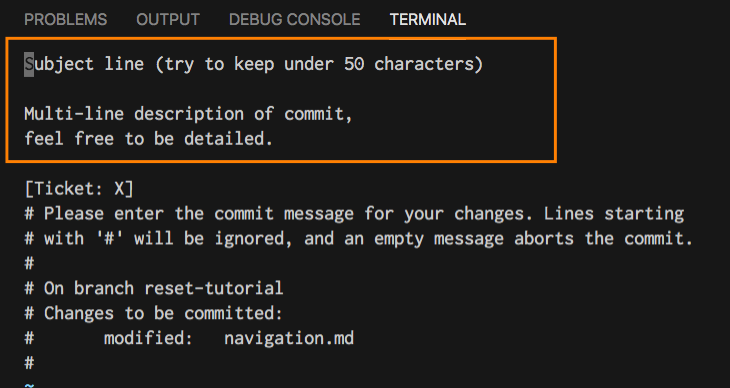
To create custom Git commit message firstly create a text file containing your message.

// example from the official Git documentation
Subject line (try to keep under 50 characters)

Multi-line description of commit,
feel free to be detailed.

[Ticket: X]

Save this file as .gitmessage in your user directory eg. ~/.gitmessage.

Then update the global config to point to the right location.

git config --global commit.template ~/.gitmessage.txt

Now you should see your own custom message when you make a new commit.

Git config tutorial

How to use Git alias?

Git alias is another setting saved in the Git config file. It lets you execute longer Git commands by predefined shortcut.

git config --global alias.last "log -1 HEAD"

If you add the above alias to your Git config you can use git last to access the log of your last commit.

The possibilities are endless.

Have you enjoyed this Git tutorial? You might also like

Conclusion

There is much more to Git config, but hopefully this article made it clear how you can configure your own Git environment.

Let me know in the comments what are your own Git tips and tricks.

Git Cheat Sheet

Git Cheat Sheet – Useful Git commands in one place

In this Git Cheat Sheet, I have put together the most frequently used Git commands for both Git beginners and seasonal professionals.

If you are constantly looking up some common Git commands, or learning Git from scratch this is for you.

Let me know what you think in the comments. Enjoy.

Continue reading