You’ve seen it in action, you’ve heard others talking about it and now you want to finally get your hands dirty and start learning GreenSock from scratch, right?
As the title suggests, this tutorial is aimed to introduce the basics of GreenSock Animations Platform (GSAP) API to a complete beginner.
If that sounds like you, keep reading.
What you’ll learn
- What is GreenSock (GSAP).
- What are TweenLite, TimelineLite, TimelineMax and TweenMax useful for.
- How to create simple animations using TweenLite.
- How to use .to(), .from(), .fromTo() methods.
- How to apply easings to your GreenSock tweens.
- How to use callback functions with TweenLite.
Why GSAP?

I am not here to convince you that GSAP is currently the best option for creating modern, interactive and elegant web animations.
Hopefully you’ve done your research and want to start learning.
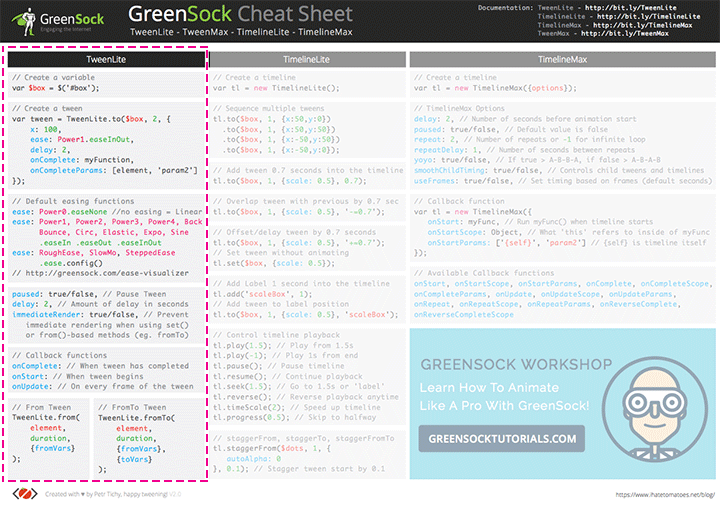
To help you get started, I’ve put together a handy GreenSock Cheat Sheet.
Now it’s a good time to download it and print it out.
DOWNLOAD GREENSOCK CHEAT CHEAT
In this tutorial we’ll cover most of the TweenLite API, but lets quickly recap what GreenSock is first.
GreenSock Overview
GreenSock is a powerful animation platform, that lets you animate almost any DOM element properties, CSS values, canvas objects and more.
It consists of 4 core tools.
 GreenSock Animation Platform (GSAP) GreenSock Animation Platform (GSAP) |
|
|---|---|
| This is an overview of all 4 GreenSock tools and what they are useful for. | |
| TweenLite | The core of GSAP, animate any property with number value eg. width,
height. With CSSPlugin you can animate any CSS property eg.
fontSize, backgroundColor. TweenLite is great for simple animations of one or a few elements. |
| TimelineLite | The container for multiple tweens or timelines. Pause, reverse, restart, speed up, slow
down, seek time, add labels and more. TimelineLite is great for sequencing multiple tweens. |
| TimelineMax | TimelineLite functionality plus repeat, yoyo, tweening to previous or next label, custom callback functions and more. TimelineMax is great for advanced sequencing of multiple tweens and timelines. |
| TweenMax | Includes all the above plus repeat, yoyo, delay and stagger individual tweens or
timelines and more. Also includes many popular plugins. TweenMax is the most powerful animation tool. |
You can read more about all of these individual tools directly on the GreenSock website.
Today we’ll learn the basics of the TweenLite API.
Before We Start Animating
We’ll be using CodePen for the code in this tutorial, but here’s a quick reference to where you can download the GSAP files if you want to follow and work with your local html files.
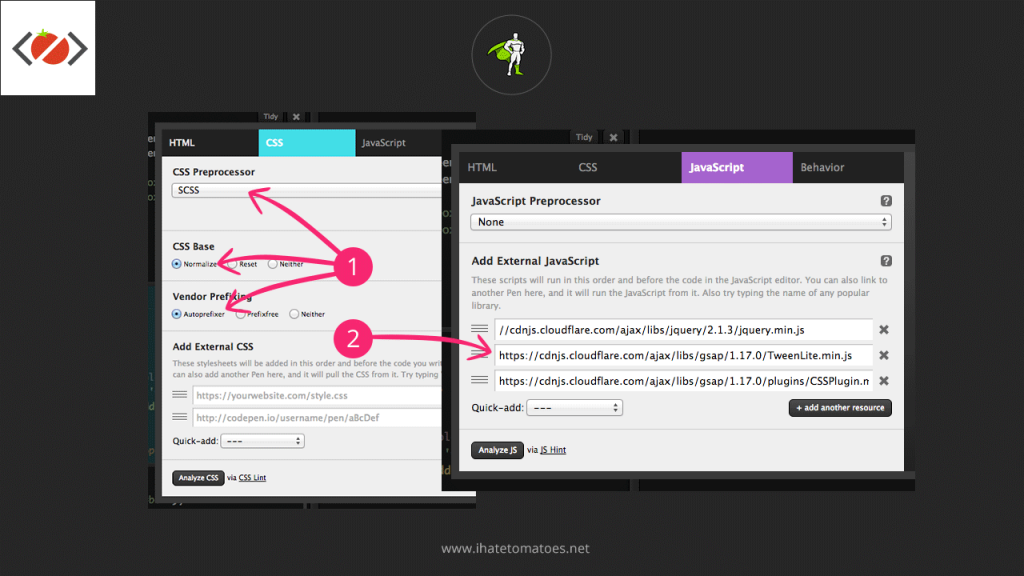
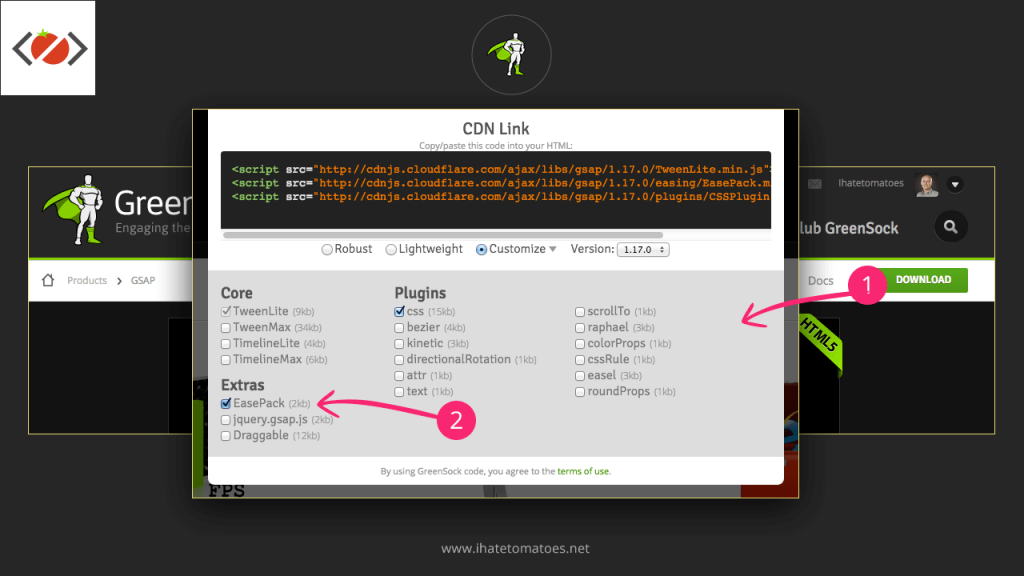
Simply go to http://greensock.com/gsap, click on the Download button, select Customize option and copy and paste the two CDN links (TweenLite.min.js and CSSPlugin.min.js) to the bottom of your html, just before the closing body tag.
Start Here
To easiest way to follow this tutorial is to fork my CodePen demo or create your own with the below settings.
Inside of the body we’ll add a simple html consisting of a #box and two .boxSmall child elements.
<div id="box">
  <div class="boxSmall"></div>
  <div class="boxSmall boxTiny"></div>
</div>
And this is our CSS, simply centering a box in the middle of the viewport.
html, body {
  height: 100%;
}
body {
  background-color: #262626;
  font-family: 'Open Sans', sans-serif;
  overflow: hidden;
}
#box {
  background-color: #88ce02;
  position: absolute;
  top: 50%;
  left: 50%;
  width: 100px;
  height: 100px;
  transform: translate(-50%, -50%);
  z-index: 1;
}

.boxSmall {
  position: absolute;
  background-color: #70a40b;
  position: absolute;
  bottom: 0;
  left: 0;
  width: 25px;
  height: 75px;
  z-index: 2;
}

.boxTiny {
  background-color: #577a14;
  height: 50px;
  bottom: 0;
  right: 0;
  left: auto;
  z-index: 3;
}
We are including jQuery for the simplicity of these tutorials, but feel free to use vanilla JavaScript if you are more comfortable with that.
As you can see, we are only including TweenLite.min.js and the CSSPlugin.min.js, this will let you find out what are TweenLite limitations and when you would need to use another GSAP Tools.
Now you should see a box in the middle of the page with two smaller rectangles inside of it.

GreenSock – TweenLite

GreenSock TweenLite can animate one or multiple properties of a single element or an array of objects (multiple elements).
1. Create a variable
To be able to move any DOM elements on the page with TweenLite we firstly need to create a variable, selecting the right element by ID or class.
In the JS panel of the CodePen demo include:
// 1. Create a variable
var $box = $('#box');
This creates a $box variable that we can reuse and apply our animations to it.
If you are new to jQuery and don’t know anything about selecting objects on the page, then this jQuery Guide For Complete Beginners might be a good starting point.
2. Create a First .to() Tween

Lets say we want to move the box all the way to the left edge of the browser. We can do that by adding this code:
// 2. Create a First .to() Tween
TweenLite.to($box, 0.7, {left: 0});
This will move our $box all the way to the left edge of the body over the duration of 0.7 seconds.
We are animating it from the position defined in the stylesheet (left: 50%) TO the position defined in the .to() tween (left: 0).
But there is a slight issue, only half of the box is visible.
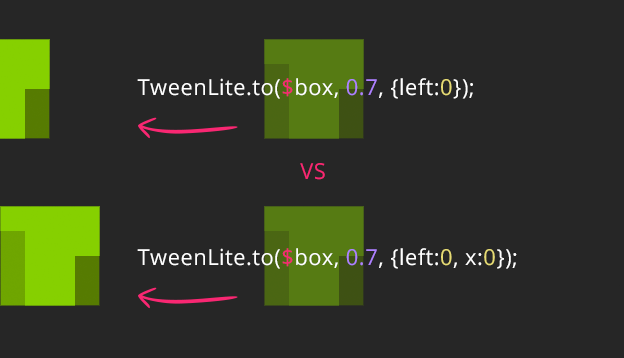
This is because in our stylesheet we’ve defined the transform: translate(–50%, –50%) and this CSS rule still applies to our $box.
To see the whole box we’ll need to also tween the x value, we can easily add this after the left tween.
// 2. Create a First .to() Tween
TweenLite.to($box, 0.7, {left: 0, x: 0});
You can animate as many CSS properties as you like, separate every property by comma.
3. Create a .from() Tween
Another method that we can use is the .from() method.
Comment out the previous tween and add this:
// 3. Create a .from() Tween
TweenLite.from($box, 2, {x: '-=200px', autoAlpha: 0});
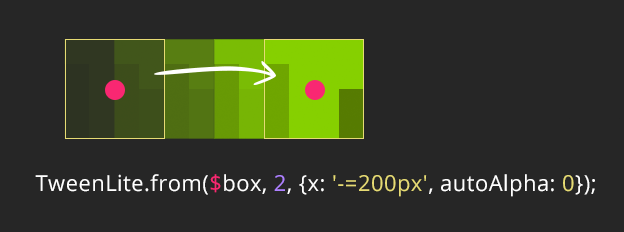
Now we are animating the box from the position defined in the .from() tween to the position defined in the stylesheet.
We will talk more about using the relative values such as -= and += in the next part of this tutorial.
As you can see it moves our box 200px to the left from the original stylesheet position and the animation starts from there.
autoAlpha is a GSAPs special property, that combines opacity and visibility into one property.
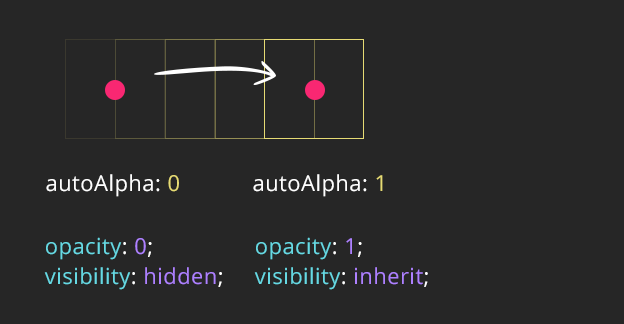
We are starting at autoAlpha: 0, at that moment the styles applied to our box are opacity: 0; visibility: hidden.
Once this tween is animating the visibility is set to inherit and the opacity is animating to 1.
To prevent invisible links and buttons from being interactive, set visibility: hidden; on them in the stylesheet by default and then fade them in when it suits.
You don’t need to set opacity: 0 in the stylesheet, GSAP is assuming that opacity should be 0 when you set visibility: hidden.
4. Create a .set() Tween
Sometimes you just want to set a property on your element without any animations, e.g. reseting a position.
That’s what the GreenSocks’ .set() method is useful for.
Comment out all previous code except the variable and paste this into your CodePen:
// 4. Create a .set() Tween
TweenLite.set($box, {x: '-=200px', scale: 0.3});
TweenLite.set($box, {x: '+=100px', scale: 0.6, delay: 1});
TweenLite.set($box, {x: '-50%', scale: 1, delay: 2});
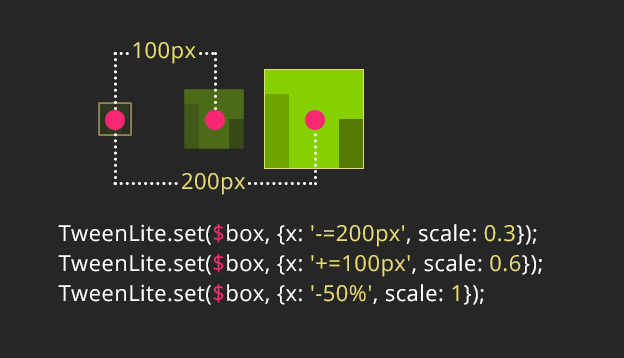
You see that the box is now changing the x position and scale without any animation.
We are also including a delay (1 and 2 seconds) on the second and third tween to make them happen in “sequence”.
Without the delay, all tweens would be played at the same time.
In our case we would just see the box at the x: '-50%' position which is our last tween.
Relative vs Absolute Values
For the x property of the first two tweens we are now using the relative values.
The first tween takes 200px away from the $box default CSS position, then we are adding 100px to the new x position and lastly we are setting the x offset to an absolute value of -50%, which is the same as the original CSS position.
Note: .set() does not have any duration, in case you are copy/pasting the other tweens, don’t forget to remove the duration.
5. Create a .fromTo() Tween
The last method of tweening with GreenSock we’ll cover today is the .fromTo() method.
As the name suggest we can define the starting and ending position in one tween like this:
// 5. Create a .fromTo() Tween
TweenLite.fromTo($box, 2, {x: '-=200px'}, {x: 150});
Copy and paste the above tween in your CodePen demo and comment out everything else apart from creating the variable.
Instead of having only one set of vars we are defining the from values first and then the to values.
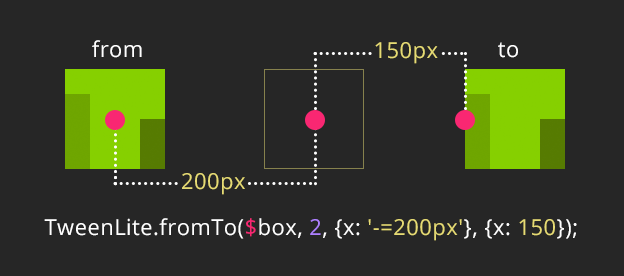
Again we are starting 200px to the left from the original CSS position.
The x:150 is overwriting our default CSS transform: translate(–50%, –50%)transform: matrix(1, 0, 0, 1, 150, -50);.
To better understand how GreenSock calculates and overwrites the default CSS transforms, watch this short video.
6. GreenSock Easing
Until now all our animations felt very unnatural and somewhat boring.
The one way how to add some personality and feeling to your GreenSock animations is by adding an easing.
TweenLite comes with a few standard eases:
- Power0 is same as Linear
- Power1 is same as Quad
- Power2 is same as Cubic
- Power3 is same as Quart
- Power4 is same as Quint
You can add another set of eases to your arsenal by including the GreenSock EasePack.
<!-- You can find all the GreenSock Plugins on CDN -->
http://cdnjs.com/libraries/gsap

<!-- Include EasePack in your CodePen for more easing functions -->
https://cdnjs.cloudflare.com/ajax/libs/gsap/1.17.0/easing/EasePack.min.js
Note: TweenMax already includes EasePack, but because we are using TweenLite we need to include it separately.
Here’s where you can download the GreenSock EasePack directly from the GreenSock website.
This will give you a few extra eases:
- Back
- SlowMo
- SteppedEase
- RoughEase
- Bounce
- Circ
- Elastic
- Expo
- Sine
All easing functions come with an easeIn, easeOut and easeInOut options.
RoughEase, SlowMo and SteppedEase can be configured to get a desired effect.
Lets add ease:Power4.easeInOut to our last tween, the easing function goes inside of the curly brackets, similar to where we have included the delay.
// 6. Easing
TweenLite.fromTo($box, 2, {x: '-=200px'}, {x: 150, ease:Power4.easeInOut});
You can see a difference to our animation straight away, now the box eases in, picks up speed and then slows down at the end.
Lets try something else and add a few more tweens with different eases.
TweenLite.to($box, 0.4, {top: '100%', y: '-100%', ease:Bounce.easeOut, delay: 2});
TweenLite.to($box, 0.7, {x: '-=200px', y: '-100%', ease:Back.easeInOut, delay: 3});
TweenLite.to($box, 0.8, {x: '-=200px', y: '-100%', ease:Back.easeInOut, delay: 4.2});
TweenLite.to($box, 2.5, {top: '50%', y: '-50%', ease:Power0.easeNone, delay: 5});
TweenLite.to($box, 2.5, {x: '+=400px', ease:Elastic.easeInOut, delay: 7.7});
TweenLite.to($box, 2.5, {x: '-=400px', rotation: -720, ease: SlowMo.ease.config(0.1, 0.7, false), delay: 10.4});
Here we are combining a few tweens with different easings, see how each of them can be used for something else?
You can explore all the available GreenSock eases and see how they affect the feel of your animation by playing with the GreenSock Ease Visualizer.
Go To GreenSock Ease Visualizer
Ok, that was fun, but we’re not done yet. TweenLite can do a few more things.
7. Callback Functions
There is a lot of ways how you can use callback functions, but for start lets just log a console message when a tween starts.
Keep only the .fromTo() tween and comment out the rest for now.
Create onStart function
// 7. Callback functions
function start(){
  console.log('start');
}
Call onStart function
Now add the onStart: start callback to the tween, it goes after a comma after the easing. Simple, right?
// 6. Easing
TweenLite.fromTo($box, 2, {x: '-=200px'}, {x: 150, ease:Power4.easeInOut, onStart: start});
If you look inside of the web developer tools console, you’ll see a message start printed in the log.
Similarly you can also use an onUpdate and onComplete callbacks.
// 7. Callback functions
function start(){
  console.log('start');
}
function update(){
  console.log('animating');
}
function complete(){
  console.log('end');
}
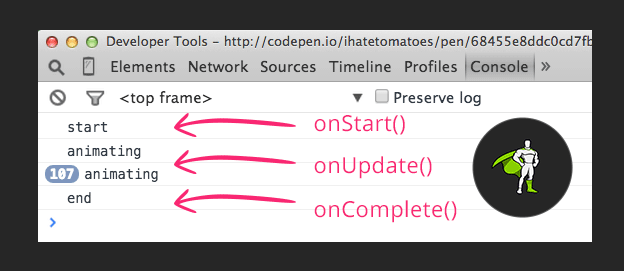
onUpdate will fire on every frame of the animations and onComplete will fire only once the end of the tween.
Final CodePen Demo
Hover over the CodePen and click on RERUN to see the final animation.
4864
Things To Know And Handy Tools
- Any CSS property that has two words separated by
-needs to be converted to camelCase e.g.background-colorbecomesbackgroundColor,border-radiusvsborderRadiusetc. - CSS
transform: rotate()isrotation. - Other 2D transforms in GSAP –
scaleX,scaleY,scale,skewX,skewY,x,y,xPercent, andyPercent(for more details about the x vs xPercent watch this video) - If you are using SublimeText you can download a handy GSAP code snippets here.
- If you are using JSHint or JSLint and are getting errors related to GSAP code, you can define GSAP globals. Here’s how to do it.
Conclusion
And this is it, a quick overview of what GreenSock TweenLite can do. To read more about it, go to the TweenLite API documentation.
Have you started to play with GSAP? Is there anything that drives you crazy or doesn’t make sense? Let me know in the comments below and next time we’ll have a look at the TimelineLite.
Until then, happy tweening.
Other GreenSock Learning Resources
- Jump Start: GSAP JS
- Getting Started Guide
- GSAP Forum
- GreenSock course at Noble Desktop in New York
- GreenSock course workbook – Print + eBook
- GreenSock Workshop – Online course with over 8hrs of GreenSock Tutorials



Thanks a lot for this amazing effort Petr. You clearly enjoy teaching 🙂 Keep them coming.
This blog is becoming my recommendation to people for a number of things including GSAP.
Great work.
Thanks for spreading the word Tahir and yes, you can look forward to more GSAP tuts over the coming weeks. If you have any GSAP questions, let me know. Cheers
Cool!
Amazing work Petr!
I’ll definetely do the tutorial:)
Unfortunately I’m a bit busy at the moment, otherwise I’d bought the workshop already.
I hope that I’ve time to learn greensock soon! 🙂
Best regards,
Norman
I now know exactly where to send people if they are interested in learning the basics!
Very informative and well explained. Definitely a good read even if you’ve already had experience with GreenSock.
Nice work Petr!
Hi Petr,
here is my pen. I just added a few comments to better understand it 🙂
http://codepen.io/bommell/pen/WvWPrg/
Awesome tutorial!! Thanks a lot 🙂
Thanks for the comment Norman, I love your comments. I am sure they will be also useful for others starting with GSAP. Does it all make sense now, or is there is anything a bit unclear?
You’re welcome! 🙂
I think you explained everything really good and it all makes sense for me! Thanks!! 🙂
Cool, I now added the CSS Plugin to animate the backgrounds.. Really cool.
Greensock is so much fun…. 🙂
Congratulations Norman, you are the official winner! Check your inbox for the instructions how to access your GreenSock Workshop.
And thanks everyone else for submitting their CodePens.
Happy tweening!
Thank you for these tutorials Petr! Here’s my pen http://codepen.io/orokoff/pen/KpjpZr
Hoping to learn more GSAP!
Thanks for sharing your knowledge Petr. This was fun.
http://codepen.io/sameasterling/pen/zGVdvp
Quality tutorials, Petr!
Here’s my pen: http://codepen.io/syghon/pen/eNawON
Thank you so much!
I can’t believe, that I won… I’m so happy and excited to start!!
Thano you sooo much Petr!!
Happy tweening!! 🙂
Cheers,
Norman
You’re welcome Norman, enjoy the workshop and let me know if you will have any GSAP questions. Cheers
Hi, I know that’s awesome to have Illustrator for GSAP stuff to work with SVGs and to follow your workshop. But I have Illustrator CS5, which doesn’t work with SVGs. So what do you recommend as an alternative to that? Something free maybe?
Hi Kire, try Inkscape – https://inkscape.org/.
I’ve tried it myself but the instalation and UI is not my cup of tea.
Here is a visual/no coding authoring tool that uses Greensock as engine: www.anitool.com
Hi Petr !
Thank you for your great job.
It seems that the visualizer link is broken, is there a new url ?
Thank you !
Thanks Manu, I have fixed the link to the Ease Visualizer.
Cheers
Petr