Tag Archives: tips

React Hooks Tutorial for Beginners

React Hooks Tutorial for Beginners

Are you new to React Hooks or would you like to know how to use GreenSock with React?

Then you should definitely understand what React Hooks are and how to use them.

In this React Hooks tutorial will learn:

What are React Hooks?

In short React Hooks let you use state and side effects in a functional components, something what was not possible before.

Before React Hooks were introduced to the world, this would be your workflow:

  1. create a functional (stateless) component
  2. realise that you need to manage an internal state of this component
  3. rewrite this component into a class component
  4. happily manage components state

Now with React Hooks it looks much more streamlined:

  1. create a functional component
  2. happily manage components state

React Hooks let you manage the state and react to state changes in functional components.

You can read more about React Hooks from the official documentation.

Now lets explore the most common state management use cases in React components.

How to manage state with React Hooks?

Imagine that we have a simple React component that needs to be either collapsed or expanded.

import React from 'react';

const Collapsible = () => {
    return (
        <div className="isExpanded">
            <h1>Item title</h1>
            ...
        </div>
    )
}

We would need to rewrite this into a class component if there were no React Hooks.

Luckily we have useState React Hook.

import React, { useState } from 'react';

const Collapsible = () => {

    const [state, setState] = useState(false);

    return (
        <div className={state ? 'isExpanded' : null}>
            <h1>Item title</h1>
            ...
        </div>
    )
}

We are importing useState from React and then creating a default state with the value of false.

Then we have access to the state variable and can render a css class when required.

If we wanted our component to be expanded by default we would set it to true by default.

How to use useState React Hook

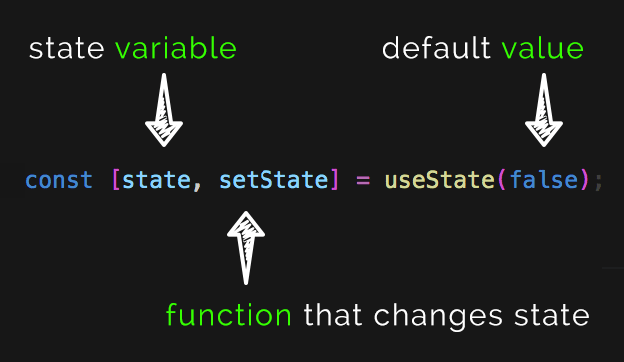
state and setState names are customisable names, you could call them whatever you like. color, setColor or user, setUser would do the same thing.

You get the point of sticking to a clear naming here.

state is the name of the stored variable and setState is a function that updates the value of this variable.

To change the value we could add onClick event to the h1 and toggle the value to the opposite true or false.

import React, { useState } from 'react';

const Collapsible = () => {

    const [state, setState] = useState(false);

    return (
        <div className={state ? 'isExpanded' : null}>
            <h1 onClick={() => setState(!state)}>Item title</h1>
            ...
        </div>
    )
}

Now we are managing the internal state of our component using the useState React Hook.

You are not limited to a single value for your state, you can store objects, arrays or even nested objects.

Here is an example of a property object being stored in the state.

const [property, setProperty] = useState({
    name: 'Hotel Heaven',
    id: 'hh123',
    location: 'Collins Street'
});

How to fetch data with React Hooks?

Another React Hook that you will need to master is useEffect().

It hooks into your React component in the same way as componentDidMount, componentDidUpdate, and componentWillUnmount used to.

Here is an example component that fetches Top board games from Board Game Geek.

import React, { useState, useEffect } from 'react';

const TopGames = () => {

    const [games, setGames] = useState([]);

    useEffect(() => {
        fetch("https://bgg-json.azurewebsites.net/hot")
            .then(response => response.json())
            .then(data => setGames(data));
    });

    return (
        <div>
            {
                games.map(game => <p>{game.title}</p>)
            }
        </div>
    )
}

We are importing useEffect React hook and then inside of it we are:

  • fetching data from an external API and
  • saving the response into a local state variable called games

The problem with the above code is that it would create an infinite loop!

The component mounts, we fetch data, the state gets updated, the components updates, we fetch data…and this continues.

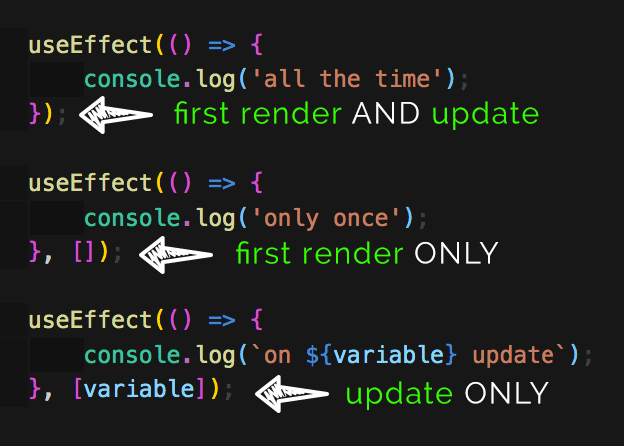
By default useEffect() runs on the first render and on every update.

How to fix the infinite loop inside of useEffect

To make the fetch call only once, we need to supply an empty array as the second parameter.

useEffect(() => {
    fetch("https://bgg-json.azurewebsites.net/hot")
        .then(response => response.json())
        .then(data => setGames(data));
}, []);

This empty array tells React to run the function inside of it only after the first render, not on update.

In another example we could include a searchTerm dependency. This would make sure that the fetch call only happens when the searchTerm variable is updated.

useEffect(() => {
    fetch(`https://someurl.com/api/${searchTerm}`)
        .then(response => response.json())
        .then(data => setGames(data));
}, [searchTerm]);

searchTerm is now a dependency for this side effect and unless searchTerm is updated, the fetch call would not run.

How to use useEffect React Hook

We have mentioned mount and update, but where is the componentWillUnmount()?

If your effect returns a function, it will be executed when it is a time for the component to be unmounted.

useEffect(() => {
    // do something here first
    // then console.log when unmouting
    return (() => {console.log('unmounting now')})
}, []);

This will simply console.log every-time this component gets removed from the DOM.

Conclusion

I hope that this article clarified a lot of your questions about React Hooks.

They are a great addition to the React API, make your code more readable and reusable.

I am currently re-recording my React 101 to include React Hooks, join me there to learn more.

Are you struggling with anything related to React Hooks? Have you tried to use GreenSock with React? Let me know in the comments.

GreenSock Snippets for VSCode

GreenSock Snippets for VSCode

Greensock Snippets for VSCode are now available for you to instal.

If you are like me, you want to have VSCode snippets extension for every language that you use.

This saves you time typing, speeds up your workflow and prevents you from making unnecessary syntax errors.

If you are keen on GreenSock Animation Platform you can now enjoy brand new GreenSock Snippets for VSCode.

What you will get

GreenSock Snippets for VSCode

Autocompletion for .to, .from, .fromTo, .set, import and timeline syntax.

Install GSAP Snippets

Let me know in the comments if I have missed some other snippets that should be also included.

The source code is on Github, feel free to contribute to it

Git merge conflict tutorial

Git merge conflict tutorial

Are Git conflicts your biggest nightmare? Do you freak out when you get a conflict?

I promise that at the end of this Git merge conflict tutorial you will be resolving conflicts without any headaches.

To simplify the merging explanations I will be referring to my-branch and his-branch, but you can substitute them for yours.

What you will learn:

How does Git merge conflict happen?

The merge conflicts happen when someone else edits the same lines of code in his branch as you edit in your branch.

In our example we have colors.txt file in the master branch and both of the other branches have a commit that has changed this file.

// colors.txt

// in master, you have both created a branch from here
red
yellow
blue

// commit in your branch
red
green
blue

// commit in his branch
red
white
blue

Do you see how the same file has a different content in both branches and the same line modified?

This would cause a merge conflict.

1. Clean table

Firstly commit or stash all of your current changes, your branch needs to be “clean” before merging.

Also if you haven’t already, switch to his-branch and pull his latest changes.

// in your branch
// commit or stash changes and switch to his branch
git commit -a -m "some message"
git stash
git checkout his-branch

// in his branch
// pull his changes and switch back to yours branch
git pull
git checkout -

Git clean branch

If you run git status you should see nothing to commit, working tree clean.

Are you new to Git? Checkout also this Git branches tutorial.

2. Git Merge

Now you are ready to merge his branch.

// in your branch
git merge his-branch

This will try to merge all his changes into your branch.

Because you have both modified colors.txt on the same line, you have to resolve this a merge conflict manually.

Git merge conflict

The green block shows your changes and calls them Current change.

The blue block shows his changes in his branch and calls them Incoming changes.

Aborting merge conflicts

If you don’t feel comfortable resolving the conflict you can always abort the merge process.

// in your branch
git merge --abort

This will return you to the state of your repo before you have started the merge process.

3. Resolving Git merge conflict

Resolve Git conflicts options

To resolve the conflict we have 3 options:

  1. Accept current change
  2. Accept incoming change
  3. Accept both changes
// resolved colors.txt

// Accept current change
red
green
blue

// Accept incoming change
red
white
blue

// Accept both changes
red
green
white
blue

This seems to be straight forward on our simple example, but I know it can be overwhelming to look at especially if your merge conflict involves big blocks of code.

One thing that helped me with merge conflicts is to use DIFF3. More on that later.

4. Commit resolved conflict

Based on your scenario pick one of the options above for every conflict and save the file.

If you have more conflicted files you will need to open them and resolve them too.

Once you have resolved all conflicts in all files you will need to stage them and commit.

// stage all files
git add . 
// commit
git commit -m "merged his-branch"

// shorter version of the above
git commit -a -m "merged his-branch"

If everything went well you should see a new commit made on your branch, your working tree clean and the merge process completed.

Git conflict resolved

An easier way to look at merge conflicts

To make it easier to resolve merge conflicts I prefer to use the DIFF3 view.

Git merge diff3

When you enable diff3 you will see a 3 way view.

  • the original version – merged common ancestor
  • current change
  • incoming change

Yellow was the original color, I have changed it to green and he has changed it to white.

To enable Diff3 you need to add it to your Git config.

git config merge.conflictstyle diff3

To find out more about Git config checkout out this Git config tutorial.

Conclusion

Resolving Git conflicts can be very frustrating and stressful situation, but hopefully this Git tutorial gave you a lot more confidence to resolve conflicts in Git.

Do you have any tips or tricks when it comes to resolving Git conflicts? Let me know in the comments.

Git config tutorial

Git Config Tutorial

Have you ever wanted to change the default commit message in Git config?

In this Git config tutorial you will learn:

If you are completely new to Git checkout out the Git Tutorial for Beginners or my complete Git tutorials playlist on Youtube.

Where do you find the Git config files?

The following Git config files locations are Mac specific.

System vs Global vs Local Git config

Before we get to the locations, I just want to clarify that there are 3 different scopes for Git config.

System Git config controls settings for all users and all repositories on your computer.

Global Git config controls settings for the currently logged in user and all his repositories.

Local Git config controls settings for a specific repository.

These 3 config files are executed in a cascading order. First the system, then global and finally the local.

That means that your local Git config will always overwrite settings set in the Global or System configs.

Git config tutorial

// System
/usr/local/git/etc

// Global
$home/.gitconfig

// Local
.git/config

In general you most likely want to edit the Global settings and occasionally set some more specific configuration for a single repositories.

Your username and email should be the same for all your repos, that is why it is stored in the Global config.

How do you view your Git config settings?

git config --list
git config --list --system
git config --list --global
git config --list --local

If you don’t specify which of the configs you would like to see, you will get all 3 configs merged into the output in your console.

To edit any of the files use the --edit flag or open the file in a text editor.

How to add or delete a record from Git config?

The following commands would add or remove your name and email from the Global config.

// to add
git config --global user.name "Your Name"
git config --global user.email "[email protected]"

// to remove
git config --global --unset user.name
git config --global --unset user.email

If you want to read a specific record from Git config use: git config user.name.

How to create a custom Git commit message?

Sometimes it is useful to create a template for your commit messages. This keeps your commits consistent.

To create custom Git commit message firstly create a text file containing your message.

// example from the official Git documentation
Subject line (try to keep under 50 characters)

Multi-line description of commit,
feel free to be detailed.

[Ticket: X]

Save this file as .gitmessage in your user directory eg. ~/.gitmessage.

Then update the global config to point to the right location.

git config --global commit.template ~/.gitmessage.txt

Now you should see your own custom message when you make a new commit.

Git config tutorial

How to use Git alias?

Git alias is another setting saved in the Git config file. It lets you execute longer Git commands by predefined shortcut.

git config --global alias.last "log -1 HEAD"

If you add the above alias to your Git config you can use git last to access the log of your last commit.

The possibilities are endless.

Have you enjoyed this Git tutorial? You might also like

Conclusion

There is much more to Git config, but hopefully this article made it clear how you can configure your own Git environment.

Let me know in the comments what are your own Git tips and tricks.

Git Cheat Sheet

Git Cheat Sheet – Useful Git commands in one place

In this Git Cheat Sheet, I have put together the most frequently used Git commands for both Git beginners and seasonal professionals.

If you are constantly looking up some common Git commands, or learning Git from scratch this is for you.

Let me know what you think in the comments. Enjoy.

Continue reading

Git reset tutorial

Git Reset Tutorial

Git reset can be quite overwhelming and scary.

If you don’t know what you are doing, things can go horribly wrong and you can lose some of your work.

In this Git reset tutorial you will learn how to undo your changes in all practical scenarios that I could think off.

Table of content

Are you new to Git? Checkout Git tutorial for beginners and Git branches tutorial.

How to unstage changes in Git

Your Scenario:

You are working on your local branch and you have staged 2 files using the git add . command.

Git reset tutorial

How do you now unstage one of the files?

The Answer:

git reset readme.me

git reset readme.me would reset only the specified file and move it to the unstaged changes.

Git reset tutorial

What if you wanted to unstage all changes currently staged?

git reset HEAD

git reset HEAD would move all your staged changes to unstaged.

Git reset tutorial

In other words it moves the HEAD pointer to the last commit, resets the staged area and keeps your changes.

What if you wanted to reset and at the same time also wanted to get rid of your changes?

git reset --hard HEAD

git reset --hard HEAD would reset HEAD to the last commit and trash all your changes. The image below shows that the readme.md file has been deleted after the hard reset.

Git reset tutorial

How to revert file to a specific commit

Your Scenario:

You are working on your local branch and you have already created a few commits but you want to revert file to a specific commit.

Git reset tutorial

Firstly you need to find out the hash ID of the commit, run the git log --pretty=oneline command.

Git reset tutorial

Pick a commit that contains the desired version of your file.

If you are not sure which commits contains the changes you are after, use the git diff command.

git checkout cb5f4f0 navigation.md

git checkout cb5f4f0 navigation.md would checkout this file and place it in your staged area.

Git reset tutorial

What if you only want to get a specific changes from this file?

You can choose what to bring back by adding -p and patch your working directory.

git checkout cb5f4f0 navigation.md -p

More on that in the next section.

How to manually edit Git changes

Your Scenario:

You need to revert changes in one of your files, but you want to choose which lines of code to bring back.

Git reset tutorial

You get a few options when you specify the -p flag:

  • y yes, bring these changes
  • n no, don’t bring changes
  • q quit and don’t bring any changes. It’s like no but for all files.
  • a stage this change and all other changes
  • d do not stage this change or any other changes in the file
  • s split the current change into smaller
  • e edit manually the current change

s will split a bigger change into smaller ones, this makes it easier to edit.

e will enter a manual mode, where you can choose which lines to bring and which ones not.

To enter the editing mode you need to press i for insert, now you are able to navigate through the changes.

Git reset tutorial

The lines marked with minus - at the start would be removed if we bring this change into our current version of the file.

To ignore removing these lines, simply delete - and replace it with an empty space .

The lines marked with plus + will be added to our current version of the file.

To prevent these lines from being included in the change, we can remove them and they will be ignored .

Here are the changes edited. We want to keep the Categories and 3 bullet points and only bring in Line 1, Line 2 and Line 3.

Git reset tutorial

Adding Heading 1 back to our file will be ignored, because we have manually deleted this line.

To quit the edit mode press Esc and type in :wq and hit enter. w for write, q for quit.

To quit without editing type :q + enter.

Below is the file patched with the recovered code from our previous commit.

Git reset tutorial

Have you enjoyed this Git tutorial? You might also like

Conclusion

If you have enjoyed this article you might also like Git tutorial for beginners and Git branches tutorial.

What is the most confusing Git feature that you would like to see explained in my future tutorials?

Let me know in the comments below.

Git Add and Git Commit

Git Tutorial for Beginners

This Git tutorial will guide you through the most frequently used Git commands and help you feel more comfortable to manage your Git repository in the terminal.

Lets go.

Table of content

What is Git and why is it useful?

Git is a free and open source distributed version control system.

What is Git? Distributed version control system

Distributed version control means that:

  • it can be installed on your computer
  • you can clone repository from a remote server
  • you can make any changes to the code
  • commit them locally, even on a plane without internet
  • then push your changes to the remote repository
  • others can pull your changes and collaborate

The opposite to distributed version control is centralized version control such as Subversion or SVN.

Git is easy to learn and has a very small footprint.

The best part about Git is its staging area, branching and out of the box integration in VSCode.

Clone, Status, Add

If you want to follow along with this article, you can clone any Git repository or even better you can create your own on GitHub.

Git Tutorial for Beginners - Git repository

Open your preferred terminal application and navigate to a folder where you want to clone the repo.

Make sure that Git is installed or download it here.

git --version 
// output 
git version 2.14.3 (Apple Git-98)

Git Clone

If the above shows a git version you are good to go.

git clone https://github.com/Ihatetomatoes/vscode-git

The above command will create vscode-git folder and save a copy of the source code in that folder.

You can also clone and choose what the folder name should be by specifying it like this:

git clone https://github.com/Ihatetomatoes/vscode-git git-tutorial

Git clone will create a new folder git-tutorial instead of the default vscode-git

Now you can navigate to the cloned folder and open it in VSCode.

cd git-tutorial
code .

Easy, now we have a local copy of the code and can start making some changes.

Git Status

Lets make any change to any of the files and look at the status.

git status

This will print out the current status, in other words it will show you what has changed since you have cloned the repo.

Git Tutorial for Beginners - Status

I have made one change to the text in index.html, that is why this file is now marked as modified.

Try to delete a file and look a the status again.

Git Tutorial for Beginners - Status

The deleted files are marked as deleted.

Lets try to add a new text file text.txt and check the status.

Git Tutorial for Beginners - Status

The deleted and modified files are tracked files because the remote repository already knows about them.

The new file is untracked, because it is completely new.

Git Add

To make sure that others can pull our new file, we need to add it first.

git add text.txt

Git add will add the file and its content to our Git repository and the status would look something like this.

Git Tutorial for Beginners - Status

The newly created file is now added and ready for commit, but the other two changes are still unstaged. Which means that if we would commit at this point, only the new file would be committed.

Git Add and Git Commit

The stage is an in-between step before commit, but if you want to skip it and add all changes directly use:

git add --all
// or
git add -A
// or
git add .

This is a shortcut how to stage all new, modified or deleted files.

Git Tutorial for Beginners - Staged changes

Now all files are staged and ready for commit.

Commit

Git commit is like a save button, it will take your current changes and save them together with a custom message.

With every commit we need to provide a simple message describing our changes.

This helps you to scan a history of commits later on, in case you need to revert back to a certain commit.

git commit -m "my changes"

Git Tutorial for Beginners - Commit

New commit has been created with an id 4b8c593.

You can find this in the Git history log and check out this version of you project in the future.

Push and pull

Git push and Git Pull

Until now all your changes are only stored locally, nobody will know what you have changed until you push your changes to the remote repository.

git push

Git push will push your local changes (commits) to the server and will let others to pull them to their computer.

git pull

Git pull will pull all new changes from the server. It lets you get the latest version of the project.

Ignoring files with .gitignore

On some projects you might want to exclude some files or folders from Git and only keep them locally.

Example of that could be your VSCode workspace settings folder.

If you change some workspace settings (I have changed autoSave to afterDelay), you will see a new folder .vscode created in the root folder of your project.

To exclude this folder from being included with your changes and tracked by Git, you need to create .gitignore file in the root of your project.

Git Tutorial for Beginners - Gitignore

Above is .gitignore created but without the .vscode folder, below we are excluding this folder from Git tracking.

Git Tutorial for Beginners - Git in VSCode

When we include .vscode in .gitignore, VSCode recognizes that. It does not show is as untracked and all changes to this folder will be ignored by Git.

This file can include a single file or a path to multiple files or folders. Refer to the gitignore documentation for all the potential patterns.

Log

Git log lets you see a history of all commits made to this repository.

It includes your local commits and also all commits made by someone else before you have cloned it.

Git Tutorial for Beginners - Git Log

The green commit is our local one, the rest of the commits are from the past on the remote.

VSCode also shows the number of local commits in the bottom left corner near the arrow up (push).

If we run git status at this stage we would see that we are 1 commit ahead of master.

Git Tutorial for Beginners - Status

You can modify the output of the Git log by specifying some options.

git log --stat
git log --pretty=oneline
git log --pretty=format:"%an, %ar, %s"
git log --pretty=format:"%h %s" --graph 

These Git log commands with different options would give you different format of the same log.

Git Tutorial for Beginners - Git Log

Refer to all the Git Log options for more.

To exit Git log, type in :q, :z or press Ctrl + z depending on your platform and OS.

Amending changes

Sometimes you might have a scenario when you do a commit but you forgot something.

You could create another commit with the new change, but you could also amend the change to a previous commit.

git commit --amend

git commit --amend would commit your change into your previous changes and everything will show as one commit.

It would be like the previous commit never happened.

Undoing your changes

There are a few options when it comes to reverting your local changes.

git reset index.html

Git reset would unstage your changes to index.html.

git checkout index.html

Git checkout reverts this file to what it was when you cloned the repo initially.

git reset --soft HEAD~

Git soft reset reverts your last commit but it would keep your staged changes.

git reset --hard

Git hard reset reverts all your staged changes.

git reset --hard origin/master

This would reset everything including your local commits.

Use reset --hard with caution, this action is irreversible.

If we use the last command we should have everything reverted and could start working on our feature again.

Conclusion

We have covered a lot. Now you know how to:

  • clone a Git repo,
  • add, delete and modify files,
  • create local commit
  • check Git status
  • see the Git log
  • undo changes in Git repository

I hope that this article was useful and all the Git commands are now less scary than before.

What do you like or don’t like about Git version control.

And what would like to learn next? Branching, merging conflicts or anything else?

Let me know in the comments.

Visual Enhancements of VScode

Useful VSCode Extensions – Visual Enhancements

Are you looking for some useful VSCode extensions that could speed up your front-end development workflow?

I have been building React and Angular projects in VSCode over the last few years and in the next few posts I will share with you my most popular VSCode extensions.

Hope you will find this collection useful.

The first section will focus on visual enhancements.

These extensions are useful for any projects, not just React or Angular development.

Related Video

Indent Rainbow

Indent Rainbow for VSCode

Indent rainbow is a simple extension that makes indentation more readable by colorizing each tab indentation.

Indent Rainbow for VSCode

By default it comes with a “rainbow” of colors, but if you prefer something more subtle like me, simply past the following configuration into your User Settings.

“indentRainbow.colors”: [
    "rgba(16,16,16,0.1)",
    "rgba(16,16,16,0.3)",
    "rgba(16,16,16,0.6)",
    "rgba(16,16,16,0.4)",
    "rgba(16,16,16,0.2)"
]

Indent Rainbow for VSCode

These colors work great with the default VSCode theme and seamlessly blend in the default VSCode color scheme.

View Extension

Bracket Pair Colorizer

Bracket Pair Colorizer for VScode

If you write React, Vue or Angular code you most likely have quite a lot of brackets in your code.

This extension helps you identify matching brackets with colors and connect them with lines too!

Bracket Pair Colorizer for VScode

You can disable the vertical and horizontal line around the block of code. Simply add this to your User Settings.

“bracketPairColorizer.showHorizontalScopeLine”: false

View Extension

Better Comments

Better Comments for VSCode

Better comments extension lets you highlight certain comments in your code.

Better Comments for VScode

Highlight things to do, questions or important notes for other developers.

View Extension

Color Highlight

Color Highlight for VSCode

Color Highlight styles css colors found in your document.

Color Highlight for VSCode

Not only does it recognize colors in your stylesheet but also in other files such as .js, .jsx, .ts, .tsx and other file extensions.

View Extension

Conclusion

What are some of your favorite extensions that fall into the category of VSCode visual enhancements?

Let me know in the comments.

And don’t forget to check out my other collection of useful extensions for VSCode.