I work on a lot of Next.js and React projects, and especially in the initial phase of each project, I have to create a lot of files for each component.
Your typical React project could include Styled Components for CSS, Storybook for a design system, and Jest for tests.
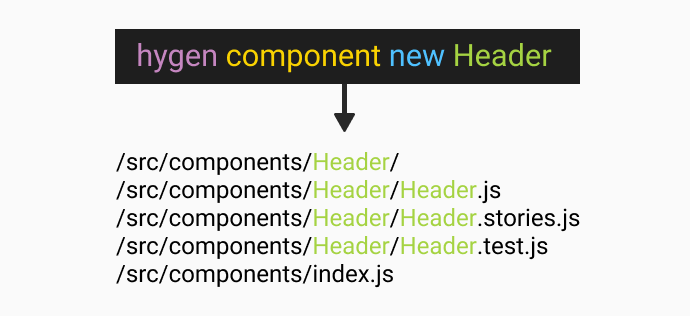
If you want to create a new Header component, you have to manually create a folder /src/components/Header and then the following files:
- create a component file –
Header.js - create a stylesheet –
Header.styles.js - create a storybook story –
Header.stories.js - create a test file –
Header.test.js
Then inside of each file you probably use some React code snippets for VSCode to quickly create a functional component or the necessary content for each file.
In this article, I will show you how you can speed up this process with Hygen.io.
If you want to save some time and speed up your front-end development workflow, keep reading.
This guide is useful for any framework or programming language and is not React or Next.js specific.
Are you new to React? Learn React from scratch in React 101.
Duplicate components
Duplicating components is another way how to quickly create all of these files, but quite often involves:
- deleting previous code inside of each file
- fixing import statements (VSCode helps with that)
- other clean up
And your app might be temporarily broken until you tidy everything up.
What we want is to run one command to generate all files and their content too!
What is Hygen?

Hygen is a scalable code generator that saves you time, simple as that.
Once you set it up, you will be able to:
- generate multiple files
- generate the content of each file based on a template
- inject any code inside of any file
The injecting part is useful if you are using index files (barel) to simplify your import statements.
We will install Hygen to do all of this for us.
How to install Hygen?
You can install Hygen globally or use npx to execute it without installing it.
// install hygen
npm i -g hygen
npx hygen ...
Firstly initiate Hygen in your current project directory.
// initiate hygen
hygen init self
This adds _templates folder in the root of your project with a generator inside of it.
Now we can create our generator and call it component.
// create new generator
hygen generator new component
To run the component generator is simple:
// run custom generator
hygen component new
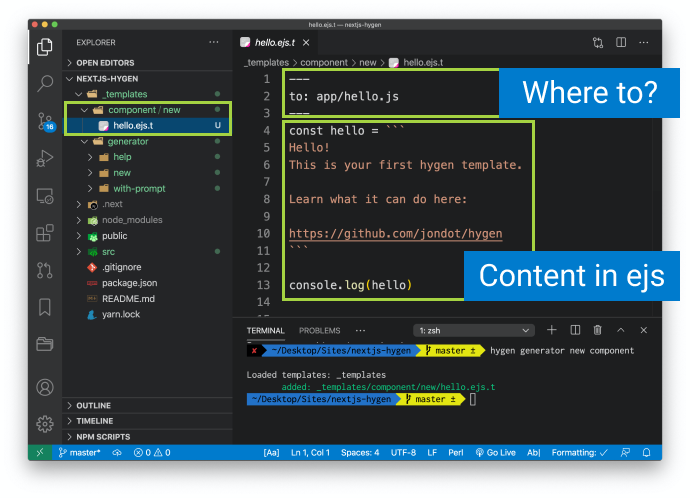
This would try to generate files based on all templates in the /_templates/component/new folder.
If we run this new component generator, Hygen would create a new file in /app/hello.js, with the hello constant and console log inside of it.
Custom templates for new React component
Modify it to create a new Header component.
You can modify the filename from hello.ejs.t to index.ejs.t, it does not really matter.

And change the content of the template to this:
---
to: src/components/<%= name %>/<%= name %>.js
---
import React from 'react'

export const <%= name %> = ({ children }) => (
  <div className="<%= h.changeCase.paramCase(name) %>">{children}</div>
)
Of course, you can include any React component snippet that you wish.
This template that would generate Header.js like this:
// /src/components/Header/Header.js
import React from 'react'

export const Header = ({ children }) => (
  <div className="header">{children}</div>
)
The top part of the template includes metadata. Here is a list of all the Frontmatter properties, such as where to create the new file.
The bottom part contains the body of the template using EJS.
Whatever your naming convention is, run the generator to create the files with the correct name, eg. header or Header.
// generate new Header component
hygen component new Header

// run in a test mode
hygen component new Header --dry

// Header is the name variable inside of the template
<%= name %>
Do you see how everything is transformed based on the name (Header) of the component? That is the beauty of setting up these templates based on your project.
It is great to dynamically generate one file, but by generating multiple files you are really speeding up your front-end development workflow.
Generate multiple files
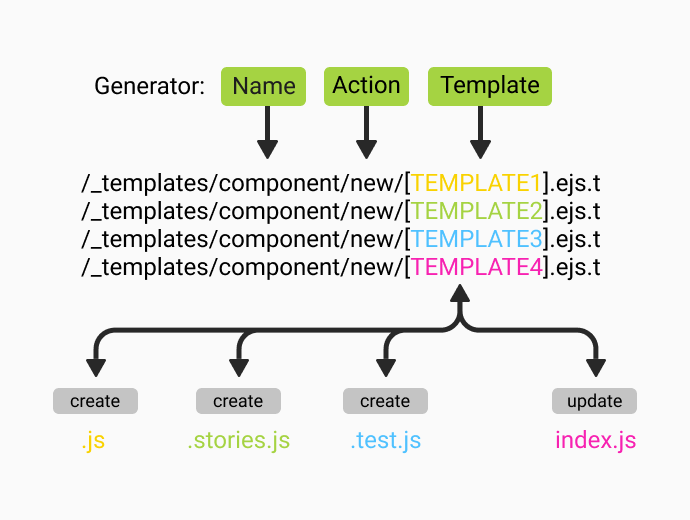
Depending on the configuration of your project, you might need to create multiple other files, not just the component folder and the js file.
For each file that you need to generate, include a new template file in _templates/component/new and name it whatever you like.
Here is an example of styled components.

// /_templates/component/new/styles.ejs.t
---
to: src/components/<%= name %>/<%= name %>.styles.js
---
import styled from 'styled-components'

export const <%= name %>Wrapper = styled.div`

`
Here is an example of a story for storybook.

// /_templates/component/new/story.ejs.t
---
to: src/components/<%= name %>/<%= name %>.stories.tsx
---
import React from 'react';
import { Meta, Story } from "@storybook/react/types-6-0";
import <%= name %>, { <%= name %>Props } from './<%= name %>';

export default {
    title: 'Components/<%= name %>',
    component: <%= name %>,
} as Meta;

const Template: Story<<%= name %>Props> = (args) => <<%= name %> {...args} />;

export const Primary = Template.bind({});
Primary.args = {};
Hygen will take all the templates in the /new folder, and generate the related files.
Pretty cool, huh?
Inject export into index.js
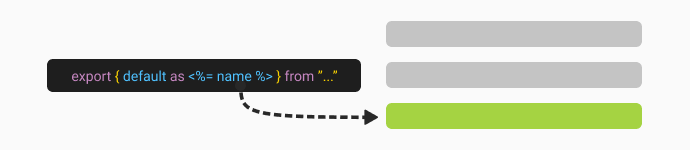
It is useful to create index.js in the components folder to simplify your import statements.
Here is how you can use Hygen to inject a line into it:
---
inject: true
to: src/components/index.js
skip_if: components/<%= name %>
append: true
---
export { default as <%= name %> } from "./<%= name %>/<%= name %>";
inject will add the content of the template to the specified file, and it will skip if the component is already there.
You can choose whether to append or prepend the new content.
Refer to the full documentation on injection to fully customise Hygen to your needs.
Variables and Helper functions
Sometimes you need to transform the name of the component to uppercase, lowercase, camelCase, and for that, there is a lot of helper functions that you can use.
Refer to the official documentation for Hygen.io.
The benefits
Apart from speeding up your front-end development workflow, you can also include these templates in the project source code for other team members to use.
- everyone saves time
- consistent project structure
- easier onboarding
Conclusion
Setting up Hygen.io does not take more than 5 to 10 minutes and can save you valuable time in the long run.
How do you generate new files on your React or Next.js project?
Let me know in the comments. I am curious.