In the previous article we’ve learned how to create basic shapes using Pixi.js, now lets look at how to work with images.
In this tutorial we will look at the basics of Pixi.js.
What You Will Learn:
- How to render image on canvas with Pixi.js
- How to use Pixi.js filters
- How to create a repeating tile background
- How to animate hue, saturation, rotation and more!
1. Create A Transparent Canvas
We will start with a transparent canvas in the middle of the viewport.
Go through the Getting started with Pixi.js tutorial to learn how we did that.
If you want to follow step by step, feel free to fork the starting CodePen.
2. Render Image On Canvas
Lets say that we want to simply render an image in the middle of the canvas.
How would we do that using Pixi.js?
/* TUTORIAL PART 2 CODE GOES HERE ------ */

// create a PIXI sprite from an image path
var hawaii = PIXI.Sprite.fromImage('https://crossorigin.me/https://s3-us-west-2.amazonaws.com/s.cdpn.io/107366/img_landscape.jpg');

// center the sprite anchor point
hawaii.anchor.x = 0;
hawaii.anchor.y = 0;

// move the sprite to the center of the canvas
hawaii.position.x = 200;
hawaii.position.y = 200;

stage.addChild(hawaii);
hawaii.anchor.x and hawaii.anchor.y moves the anchor point to the center of the image and hawaii.position.x and hawaii.position.y moves this point to the center of the canvas.
PIXI sprite anchor is by default set to 0, 0 this means that any modificatin to the position or rotation would be calculated from the top left of the image.
1, 1 would make the bottom right the anchor point.
4864
Cross Origin Assets
Notice that I am including http://crossorigin.me before the actual URL of our image.
Without that CodePen would complain about a Cross-Origin resource. Read more about loading resources from other website here.
requestAnimationFrame()
To make the image render on the canvas we will also need to call the requestAnimationFrame() method inside of our render function.
function render(){
  requestAnimationFrame(render);
  renderer.render(stage);
}
We are passing the render function to the requestAnimationFrame, this will be also handy when we start animating later on.
Read more about requestAnimationFrame() method.
Now lets have a look at the filters.
3. PIXI Filters
Now we will explore a few filters that you can apply to your images before rendering them.
Blur Filters

Firstly we create the filter, then we will apply the filter to the image.
hawaii.position.y = 200;

var blurFilter = new PIXI.filters.BlurFilter();
hawaii.filters = [blurFilter];

stage.addChild(hawaii);
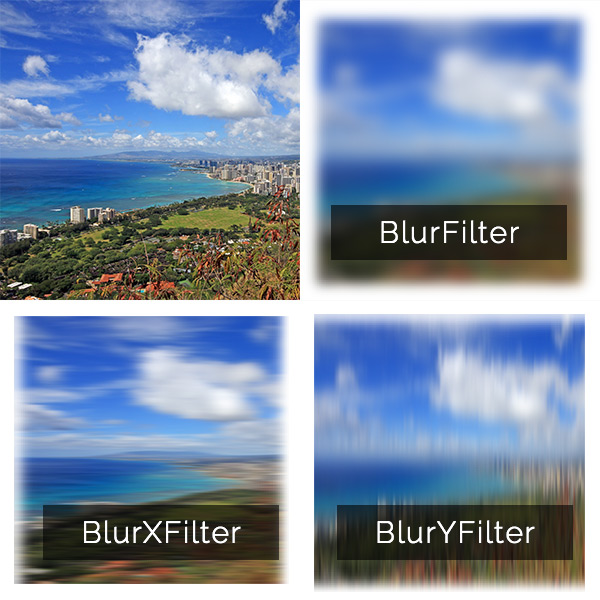
Pixi BlurFilter applies a Gaussian blur to the image.
You can also specify the strength of the blur.
var blurFilter = new PIXI.filters.BlurFilter();
blurFilter.blur = 2;
hawaii.filters = [blurFilter];
The official documentation says that the default value is 2, but you will see that it results in a much softer blur. Looks like 8 is the default value.
If you want to only blur the image horizontally or vertically, you can define the x and y values individually.
//blurFilter.blur = 2;
blurFilter.blurX = 1;
blurFilter.blurY = 10;
Play with the values to see how the blur affects the image.
You can also use BlurXFilter or BlurYFilter to achieve similar results.
ColorMatrixFilter Filter
ColorMatrixFilter can get very complicated, but we will try to keep it simple to give you an idea when and how to use it.
The following code will decrease the brightness of the stage.
colorMatrix = [
//R  G  B  A
  1, 0, 0, 0,
  0, 1, 0, 0,
  0, 0, 1, 0,
  0, 0, 0, 1
];
filter = new PIXI.filters.ColorMatrixFilter();
filter.matrix = colorMatrix;
stage.filters = [filter];

filter.brightness(0.5, false);
Setting the brightness to 0 would make the image completely black, 2 would make it very bright.
In simple terms the colorMatrix array represents the current canvas colors.
If we don’t apply the filter.brightness(), the image would look exactly the same as the original.
Once we apply the brightness, all colors (pixels) are re-rendered with new modified values (darker or lighter image).
You can read more detailed explanation about ColorMatrix and how it works here.
There is a lot of other filters we can use.
filter.contrast(0.5, true);
filter.desaturate();
filter.greyscale(0.4, false);
filter.hue(180, false);
filter.negative(true);
filter.saturate(2, false);
filter.sepia(false);
filter.technicolor(true);
filter.browni(true);
filter.kodachrome(true);
filter.toBGR(true);
You can combine all of these options to achieve a desired effect.
Play with the values in the CodePen to see how it affects the final render.
4. Animating Pixi Filters
Now that we are familiar with some of the filters, lets have a look how we can animate them.
var count = 0;

function render(){
  requestAnimationFrame(render);

  var newVal = 180 * Math.sin(count);
  filter.hue(newVal, false);

  count += 0.01;

  renderer.render(stage);
}
We create a variable count that we will increase on each frame (60fps) of the animation.
newVal is a simple calculation that returns a value between -180 and 180.
4864
Here is are similar demos that animate saturation and multiple filters of the image at the same time.
4864
4864
Pretty cool, huh?
Check the official documentation for the list of all filters available with Pixi.js.
5. How to render tiled texture with Pixi.js?
Ok, so we can render a single image and change the appearance of it if we want to, but how do we repeat one image as a background tile of our canvas?
For this demo we will revert back to the starting Codepen, if you are following me step by step, simply fork this CodePen again.
var tile, tilingSprite, count = 0;

tile = PIXI.Texture.fromImage('https://crossorigin.me/https://s3-us-west-2.amazonaws.com/s.cdpn.io/107366/img_repeat-me.png');
var tilingSprite = new PIXI.extras.TilingSprite(tile, 900, 900);

stage.addChild(tilingSprite);
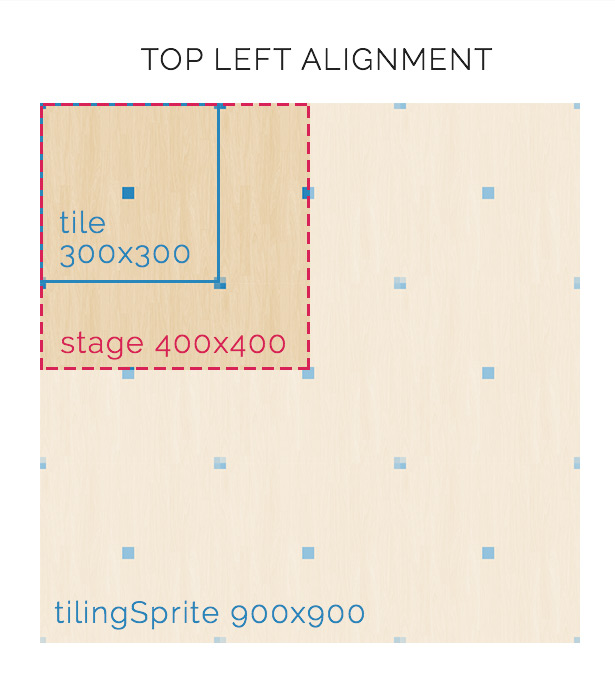
This will take the tile and repeat it on the tilingSprite (900px wide and 900px tall) and position it to the top left of our stage.

We have made it intentionally 3x bigger than the tile image itself.
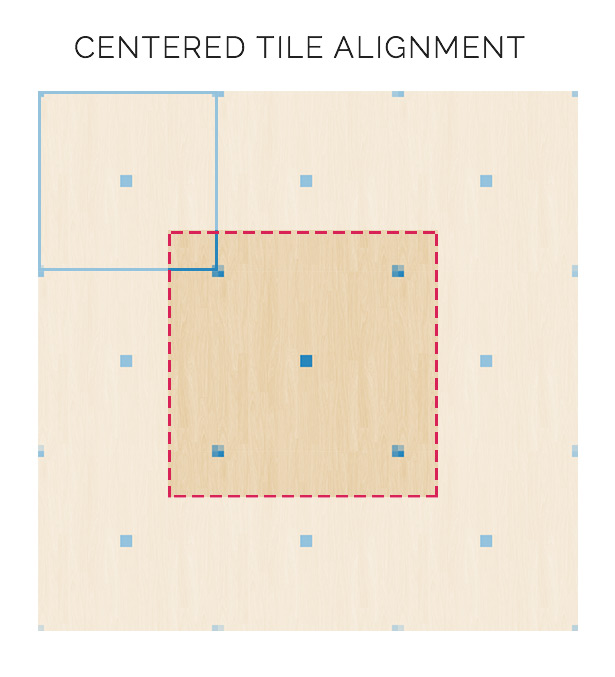
By simply defining the right anchor and position we will center it on the canvas, this will let us rotate the background (tilingSprite) around the center point and still make the tile repeated.
var tilingSprite = new PIXI.extras.TilingSprite(tile, 900, 900);

tilingSprite.anchor.x = 0.5;
tilingSprite.anchor.y = 0.5;
tilingSprite.position.x = 200;
tilingSprite.position.y = 200;

I wish there was more easier way how to simulate background-position: '50% 50%' that you might be familiar from CSS.
Now we can rotate the tilingSprite inside of the render function.
tilingSprite.rotation = 1 + count;
count += 0.001;
Here is the demo.
4864
6. How does the Pixi.js DisplacementFilter work?
One filter that deserves it’s own section in this tutorial is the DisplacementFilter.
We will start with the Hawaii photo rendered in the middle of the canvas.
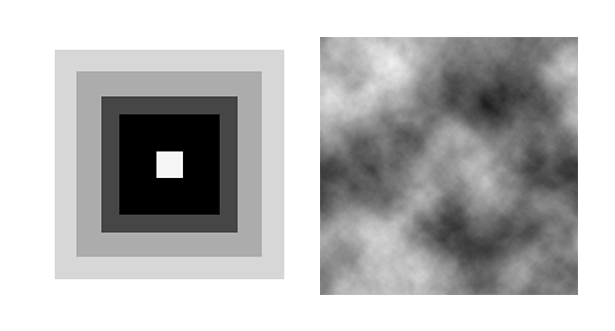
We will create a displacementTexture from two greyscale images – img_squares.png or img_clouds.png.

And apply the displacementFilter to the stage like we did with other previous filters.
// Filter
//var displacementTexture = PIXI.Sprite.fromImage('https://crossorigin.me/https://s3-us-west-2.amazonaws.com/s.cdpn.io/107366/img_squares.png');

var displacementTexture = PIXI.Sprite.fromImage('https://crossorigin.me/https://s3-us-west-2.amazonaws.com/s.cdpn.io/107366/img_clouds.png');

var displacementFilter = new PIXI.filters.DisplacementFilter(displacementTexture);

// Apply it
stage.filters = [displacementFilter];
I am including two images so you can uncomment the other one to see how different the effects are.
4864
DisplacementFilter has the biggest visual impact when it is animated. Update the render function and see the magic:)
var count = 1;
var x = 20;

function render(){
  requestAnimationFrame(render);

  displacementFilter.scale.x = 10 * Math.sin(count);
  displacementFilter.scale.y = 10 * Math.sin(count*1.2);

  count += 0.05;

  renderer.render(stage);
}
Now you will see the original image being re-rendered with the new pixel values.
4864
Inside of the render function we are animating the x and y scale of the displacementFilter, this creates the very nice watery effect.
Here is the other variation with the different displacement image.
4864
And that is it for today!
Conclusion
Wow, we have covered a lot!
We have learned how to render a single image, repeated backgrounds, how to use Pixi.js filters and how to animate them.
Did you find this breakdown useful? Let me know in the comment.
Next time we will look more into the animation aspect of Pixi.js.
Until then, happy coding.
Related Articles
- How to work with images and Pixi.js
- The Guide to HTML5 Canvas JavaScript Libraries
- The Guide to Scrolling Animation Libraries
Like What You're Reading?
Sign up to receive my future tutorials and demos straight to your inbox.
No spam, Unsubscribe at any time.


Hey Petr, thanks for your great tutorials! When I think about canvas everytime stripe.com comes to my mind. May you have an eye on their site and may you do some Tutorials about their canvas effects, for example the about us page (many animated image canvas) or their futuristic connect page? This would be awesome 🙂
I see what I can do Pascal, thanks for the suggestion. Keep them coming!