Tag Archives: css3

Git config tutorial

Git Config Tutorial

Have you ever wanted to change the default commit message in Git config?

In this Git config tutorial you will learn:

If you are completely new to Git checkout out the Git Tutorial for Beginners or my complete Git tutorials playlist on Youtube.

Where do you find the Git config files?

The following Git config files locations are Mac specific.

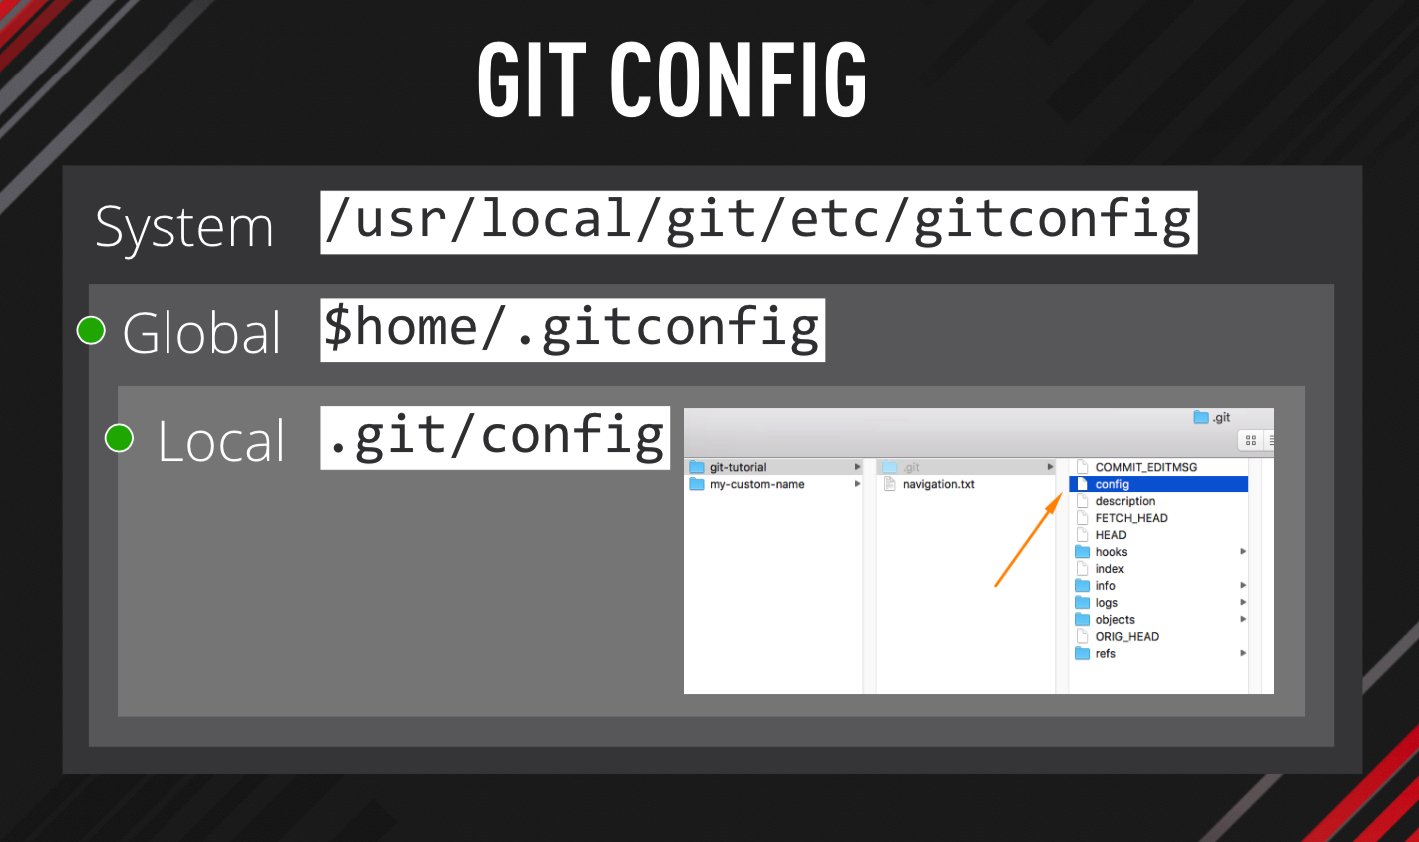
System vs Global vs Local Git config

Before we get to the locations, I just want to clarify that there are 3 different scopes for Git config.

System Git config controls settings for all users and all repositories on your computer.

Global Git config controls settings for the currently logged in user and all his repositories.

Local Git config controls settings for a specific repository.

These 3 config files are executed in a cascading order. First the system, then global and finally the local.

That means that your local Git config will always overwrite settings set in the Global or System configs.

Git config tutorial

// System
/usr/local/git/etc

// Global
$home/.gitconfig

// Local
.git/config

In general you most likely want to edit the Global settings and occasionally set some more specific configuration for a single repositories.

Your username and email should be the same for all your repos, that is why it is stored in the Global config.

How do you view your Git config settings?

git config --list
git config --list --system
git config --list --global
git config --list --local

If you don’t specify which of the configs you would like to see, you will get all 3 configs merged into the output in your console.

To edit any of the files use the --edit flag or open the file in a text editor.

How to add or delete a record from Git config?

The following commands would add or remove your name and email from the Global config.

// to add
git config --global user.name "Your Name"
git config --global user.email "[email protected]"

// to remove
git config --global --unset user.name
git config --global --unset user.email

If you want to read a specific record from Git config use: git config user.name.

How to create a custom Git commit message?

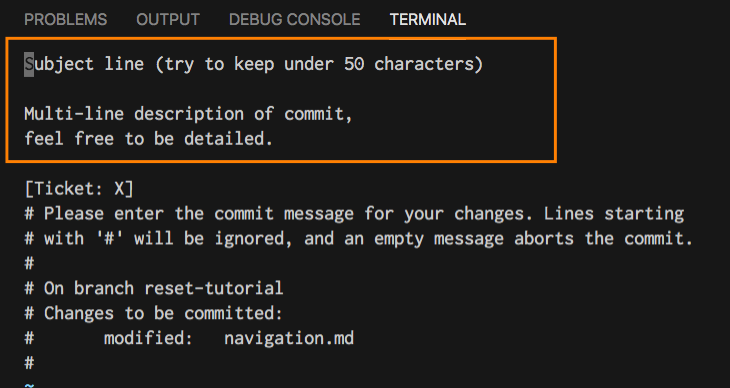
Sometimes it is useful to create a template for your commit messages. This keeps your commits consistent.

To create custom Git commit message firstly create a text file containing your message.

// example from the official Git documentation
Subject line (try to keep under 50 characters)

Multi-line description of commit,
feel free to be detailed.

[Ticket: X]

Save this file as .gitmessage in your user directory eg. ~/.gitmessage.

Then update the global config to point to the right location.

git config --global commit.template ~/.gitmessage.txt

Now you should see your own custom message when you make a new commit.
Git config tutorial

How to use Git alias?

Git alias is another setting saved in the Git config file. It lets you execute longer Git commands by predefined shortcut.

git config --global alias.last "log -1 HEAD"

If you add the above alias to your Git config you can use git last to access the log of your last commit.

The possibilities are endless.

Have you enjoyed this Git tutorial? You might also like

Conclusion

There is much more to Git config, but hopefully this article made it clear how you can configure your own Git environment.

Let me know in the comments what are your own Git tips and tricks.

Git reset tutorial

Git Reset Tutorial

Git reset can be quite overwhelming and scary.

If you don’t know what you are doing, things can go horribly wrong and you can lose some of your work.

In this Git reset tutorial you will learn how to undo your changes in all practical scenarios that I could think off.

Table of content

Are you new to Git? Checkout Git tutorial for beginners and Git branches tutorial.

How to unstage changes in Git

Your Scenario:

You are working on your local branch and you have staged 2 files using the git add . command.

Git reset tutorial

How do you now unstage one of the files?

The Answer:

git reset readme.me

git reset readme.me would reset only the specified file and move it to the unstaged changes.

Git reset tutorial

What if you wanted to unstage all changes currently staged?

git reset HEAD

git reset HEAD would move all your staged changes to unstaged.

Git reset tutorial

In other words it moves the HEAD pointer to the last commit, resets the staged area and keeps your changes.

What if you wanted to reset and at the same time also wanted to get rid of your changes?

git reset --hard HEAD

git reset --hard HEAD would reset HEAD to the last commit and trash all your changes. The image below shows that the readme.md file has been deleted after the hard reset.

Git reset tutorial

How to revert file to a specific commit

Your Scenario:

You are working on your local branch and you have already created a few commits but you want to revert file to a specific commit.

Git reset tutorial

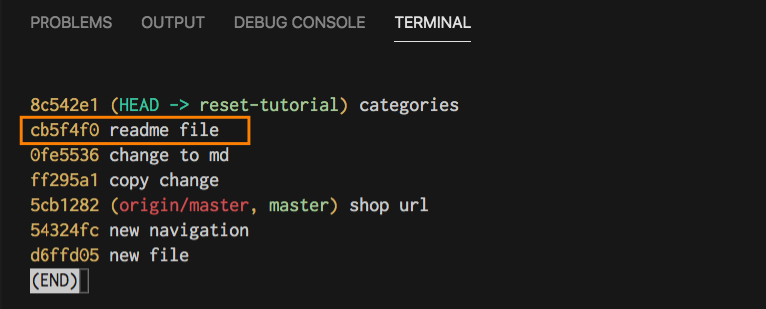
Firstly you need to find out the hash ID of the commit, run the git log --pretty=oneline command.

Git reset tutorial

Pick a commit that contains the desired version of your file.

If you are not sure which commits contains the changes you are after, use the git diff command.

git checkout cb5f4f0 navigation.md

git checkout cb5f4f0 navigation.md would checkout this file and place it in your staged area.

Git reset tutorial

What if you only want to get a specific changes from this file?

You can choose what to bring back by adding -p and patch your working directory.

git checkout cb5f4f0 navigation.md -p

More on that in the next section.

How to manually edit Git changes

Your Scenario:

You need to revert changes in one of your files, but you want to choose which lines of code to bring back.

Git reset tutorial

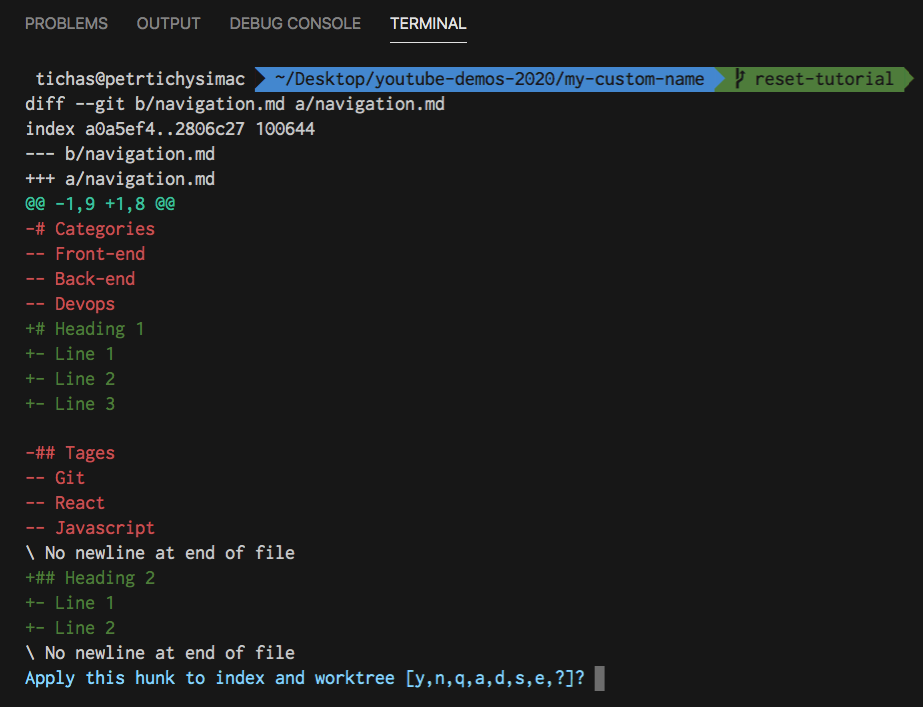
You get a few options when you specify the -p flag:

  • y yes, bring these changes
  • n no, don’t bring changes
  • q quit and don’t bring any changes. It’s like no but for all files.
  • a stage this change and all other changes
  • d do not stage this change or any other changes in the file
  • s split the current change into smaller
  • e edit manually the current change

s will split a bigger change into smaller ones, this makes it easier to edit.

e will enter a manual mode, where you can choose which lines to bring and which ones not.

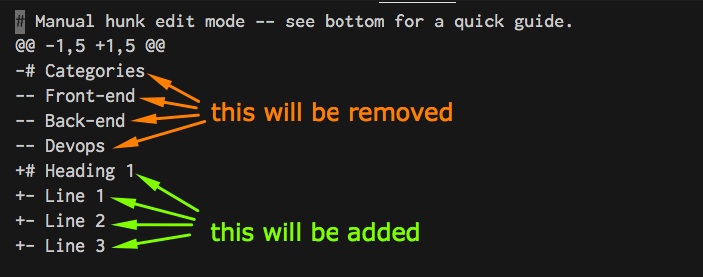
To enter the editing mode you need to press i for insert, now you are able to navigate through the changes.

Git reset tutorial

The lines marked with minus - at the start would be removed if we bring this change into our current version of the file.

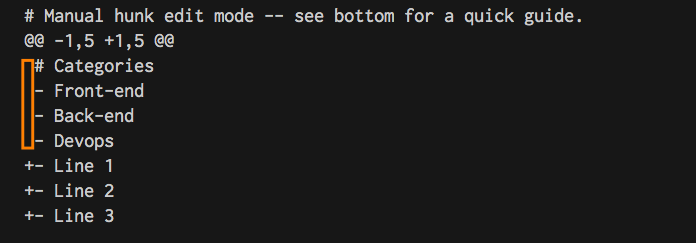
To ignore removing these lines, simply delete - and replace it with an empty space .

The lines marked with plus + will be added to our current version of the file.

To prevent these lines from being included in the change, we can remove them and they will be ignored .

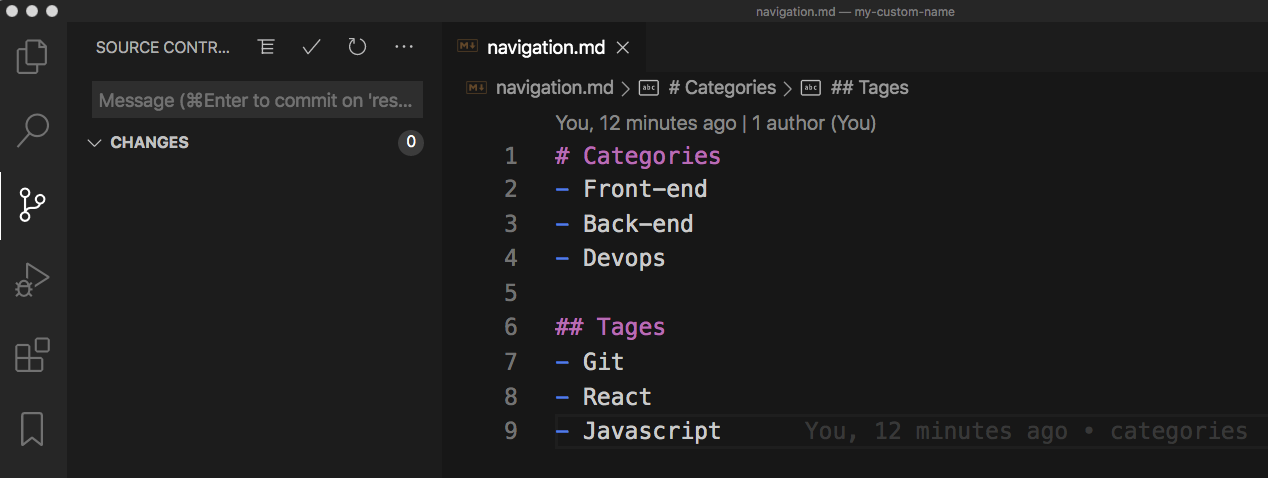
Here are the changes edited. We want to keep the Categories and 3 bullet points and only bring in Line 1, Line 2 and Line 3.

Git reset tutorial

Adding Heading 1 back to our file will be ignored, because we have manually deleted this line.

To quit the edit mode press Esc and type in :wq and hit enter. w for write, q for quit.

To quit without editing type :q + enter.

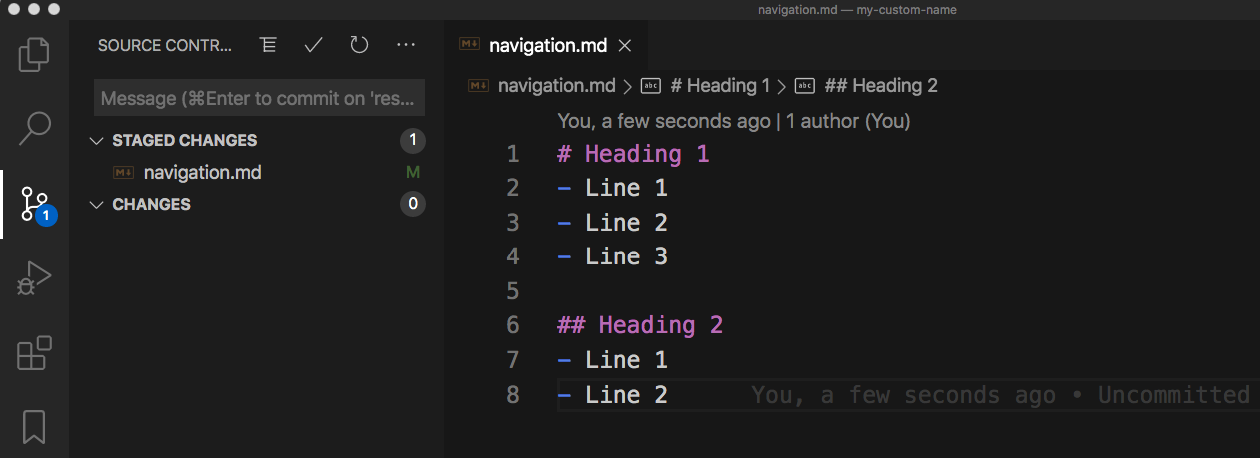
Below is the file patched with the recovered code from our previous commit.

Git reset tutorial

Have you enjoyed this Git tutorial? You might also like

Conclusion

If you have enjoyed this article you might also like Git tutorial for beginners and Git branches tutorial.

What is the most confusing Git feature that you would like to see explained in my future tutorials?

Let me know in the comments below.

Visual Enhancements of VScode

Useful VSCode Extensions – Visual Enhancements

Are you looking for some useful VSCode extensions that could speed up your front-end development workflow?

I have been building React and Angular projects in VSCode over the last few years and in the next few posts I will share with you my most popular VSCode extensions.

Hope you will find this collection useful.

The first section will focus on visual enhancements.

These extensions are useful for any projects, not just React or Angular development.

Related Video

Indent Rainbow

Indent Rainbow for VSCode

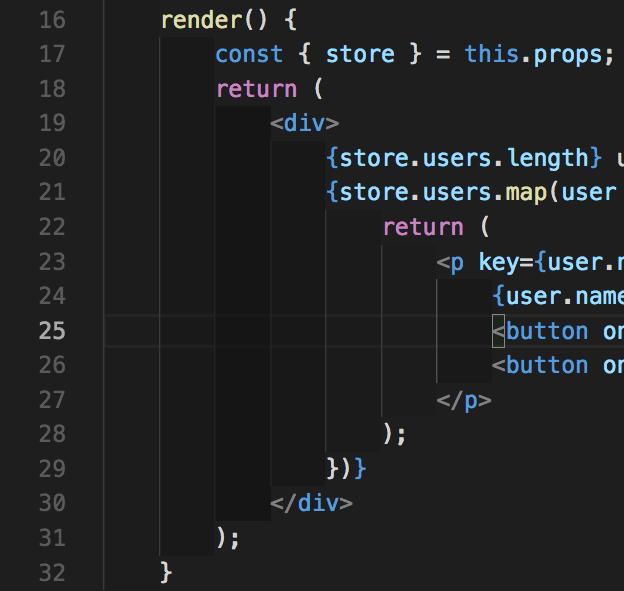
Indent rainbow is a simple extension that makes indentation more readable by colorizing each tab indentation.

Indent Rainbow for VSCode

By default it comes with a “rainbow” of colors, but if you prefer something more subtle like me, simply past the following configuration into your User Settings.

“indentRainbow.colors”: [
    "rgba(16,16,16,0.1)",
    "rgba(16,16,16,0.3)",
    "rgba(16,16,16,0.6)",
    "rgba(16,16,16,0.4)",
    "rgba(16,16,16,0.2)"
]

Indent Rainbow for VSCode

These colors work great with the default VSCode theme and seamlessly blend in the default VSCode color scheme.

View Extension

Bracket Pair Colorizer

Bracket Pair Colorizer for VScode

If you write React, Vue or Angular code you most likely have quite a lot of brackets in your code.

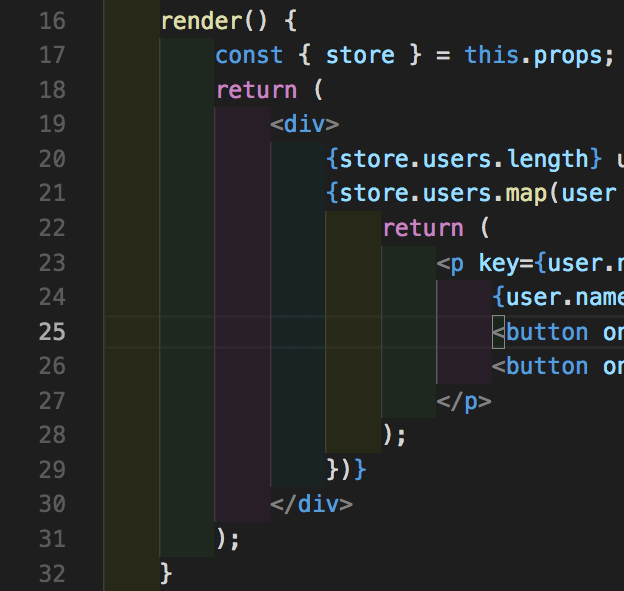
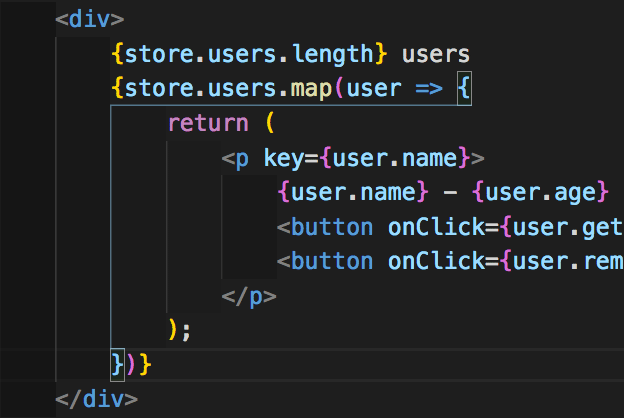
This extension helps you identify matching brackets with colors and connect them with lines too!

Bracket Pair Colorizer for VScode

You can disable the vertical and horizontal line around the block of code. Simply add this to your User Settings.

“bracketPairColorizer.showHorizontalScopeLine”: false

View Extension

Better Comments

Better Comments for VSCode

Better comments extension lets you highlight certain comments in your code.

Better Comments for VScode

Highlight things to do, questions or important notes for other developers.

View Extension

Color Highlight

Color Highlight for VSCode

Color Highlight styles css colors found in your document.

Color Highlight for VSCode

Not only does it recognize colors in your stylesheet but also in other files such as .js, .jsx, .ts, .tsx and other file extensions.

View Extension

Conclusion

What are some of your favorite extensions that fall into the category of VSCode visual enhancements?

Let me know in the comments.

And don’t forget to check out my other collection of useful extensions for VSCode.

React License Update

React license update – What does it mean for React developers?

The React license has been a concern for the open source community for some time.

Today Facebook has released a statement that React, Jest, Flow, and Immutable.js will be relicensed under the MIT license.

Great news for everyone.

Related Video

Related Tweet

Why the React license update?

Facebook is responding to the reaction of the open source community. Since introducing the BSD + Patents license for React, many developers and companies started to look for alternatives to React.

The founding developer of WordPress Matt Mullenweg announced in his On React and WordPress article that his team is taking a step back and will be rewriting the upcoming version of WordPress (Gutenberg) using a different library.

It will be interesting to see if WordPress spends their time and money rewriting Gutenberg using a different library or this React license update will be enough to win them back.

I would love to see WordPress use React for their codebase in the near future.

What does it mean for React developers?

This update means that everyone can focus on developing and shipping great products instead of worrying about any licensing issues.

No more legal conversations and confusion.

  • The license will be updated for React 16.x and backported to React 15.x.
  • Only React, Jest, Flow, and Immutable.js will be relicensed.
  • GraphQL and React Native do not inherit the MIT license at the moment of writing this post.
  • Other notable projects that use MIT License include Ruby on Rails, Node.js or jQuery.

Conclusion

What do you think about the update? Were you confused about the React licensing issue?

Were you looking for alternatives to React and if so which one did you choose and why?

Let me know in the comments.