Category Archives: Tutorial

Barba.js - Fluid smooth page transitions

How To Make Page Transitions in HTML – Barba.js and GSAP3 Tutorial

Page transitions are a thoroughly popular tool to help make your website stand out!

Smooth, fluid, and creative transitions often sets awarding winning websites apart from the rest.

Page Transitions Tuturial

In this tutorial we will demonstrate how to create a simple page transition using Barba.js and GreenSock.

What you will learn:

View Demo Download Files

Introduction to Page Transitions

Whilst creating page transitions may sound difficult, Barba.js makes the process incredibly easy.

There are two types of page transitions:

Now, let’s walk through the process of creating a loading screen page transition on a project with 2 static html pages.

/css/app.css
/js/main.js
index.html
page2.html

1. Create a loading screen
Page Transitions Tutorial

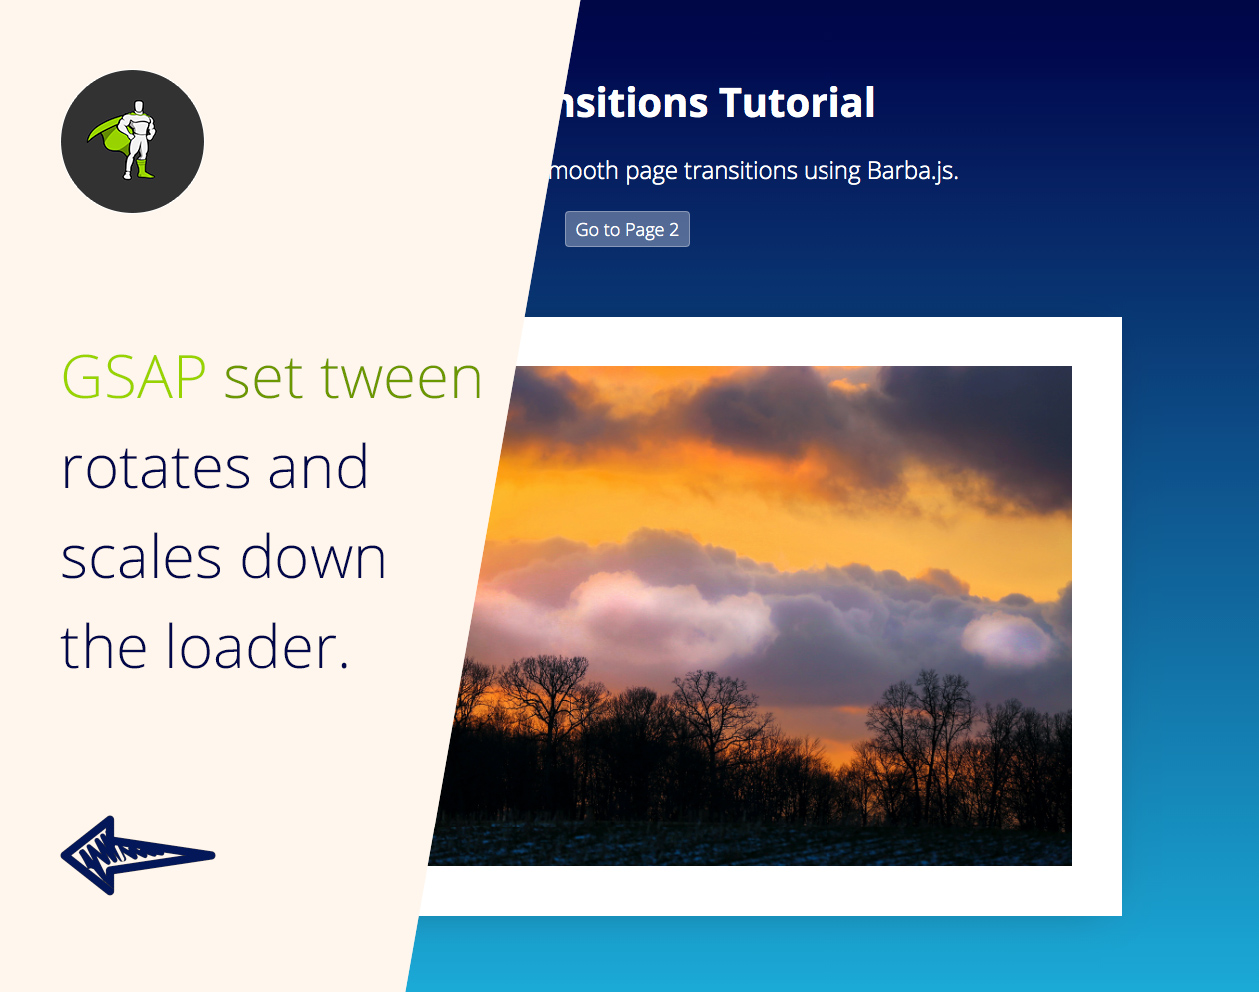
Firstly, we will create a loading screen .loader. This will be a container that will cover our screen while Barba.js is loading the next page.

<div class="loader"></div>

.loader {
    position: fixed;
    width: 100vw;
    height: 200vh;
    pointer-events: none;
    background-color: #FFF6ED;
    z-index: 1;
    visibility: hidden;
    opacity: 0;
}

We will make it position: fixed and the height twice as tall as the screen height: 200vh. This is because we will soon be slightly rotating it. Without any rotation a height: 100vh would be enough to cover the whole screen.

Opacity and visiblity are set to 0 and hidden, because we don’t want to see a flash of the loader before GSAP scales it down.

// reset position of the loading screen
gsap.set(loader, {
    scaleX: 0, 
    rotation: 10, 
    xPercent: -5,
    yPercent: -50, 
    transformOrigin: 'left center', 
    autoAlpha: 1
});

In the main.js we are rotating the loader and setting the scaleX to 0 to make it invisible for the user. At the same time we are setting visibility: visible and opacity: 1 using GreenSock’s handy autoAlpha property.

2. Include Barba.js

Barba.js - Fluid smooth page transitions

Include Barba.js at the bottom of both HTML files.

<script src="https://unpkg.com/@barba/core"></script>
<script src="https://cdnjs.cloudflare.com/ajax/libs/gsap/3.3.4/gsap.min.js"></script>
<script src="js/main.js" defer></script>

I am also including GreenSock because Barba.js is not an animation library – it only takes care of content loading.

Your preferred animation library and style of page transition is completely up to you.

I tend to choose GreenSock for its flexibility and easy functionality. I have also become very familiar with it.

If you want to learn how to use GreenSock from scratch, check out GreenSock 101.

There are plenty of other animation libraries that would also work well, such as popmotion, animejs, mojs or spirit.

3. HTML Markup

Barba.js requires two special data-attributes somewhere in your markup.

<body data-barba="wrapper">
    <!-- content that stays the same on all pages - eg. header -->
    <div id="intro" data-barba="container">
        <!-- content that will change from page to page -->
    </div>
    <!-- content that stays the same on all pages - eg. footer -->
</div>

data-barba="wrapper" specifies the main wrapper of your page structure. This could be in the body or any other HTML element.

data-barba="container" is a section of your page which will be “reloaded or updated,” with the incoming content from the other page.

Anything outside of the container will not change between the page transitions.

You can use any markup you want, the only requirement is that the wrapper always needs to wrap the container.

4. Init Barba.js

barba.init({
    transitions: [{
        async leave() {
            await loaderIn();
        },
        enter() {
            loaderAway();
        }
    }]
});

In the main.js, we then initiate Barba.js to create our transition.

leave() will be executed first, followed by enter().

loaderIn() is a function that returns GSAP tween which stretches our .loader to cover the whole screen.

loaderAway() is a function that returns GSAP tween which scales the loader back to scaleX:0, when the new page is loaded underneath it.

5. GreenSock Animations
Page Transitions Tutorial

Now let’s have a look at the two tweens which create the transition.

function loaderIn() {
    // GSAP tween to stretch the loading screen across the whole screen
    return gsap.fromTo(loader, 
        {
            rotation: 10,
            scaleX: 0,
            xPercent: -5
        },
        { 
            duration: 0.8,
            xPercent: 0,
            scaleX: 1, 
            rotation: 0,
            ease: 'power4.inOut', 
            transformOrigin: 'left center'
        });
}

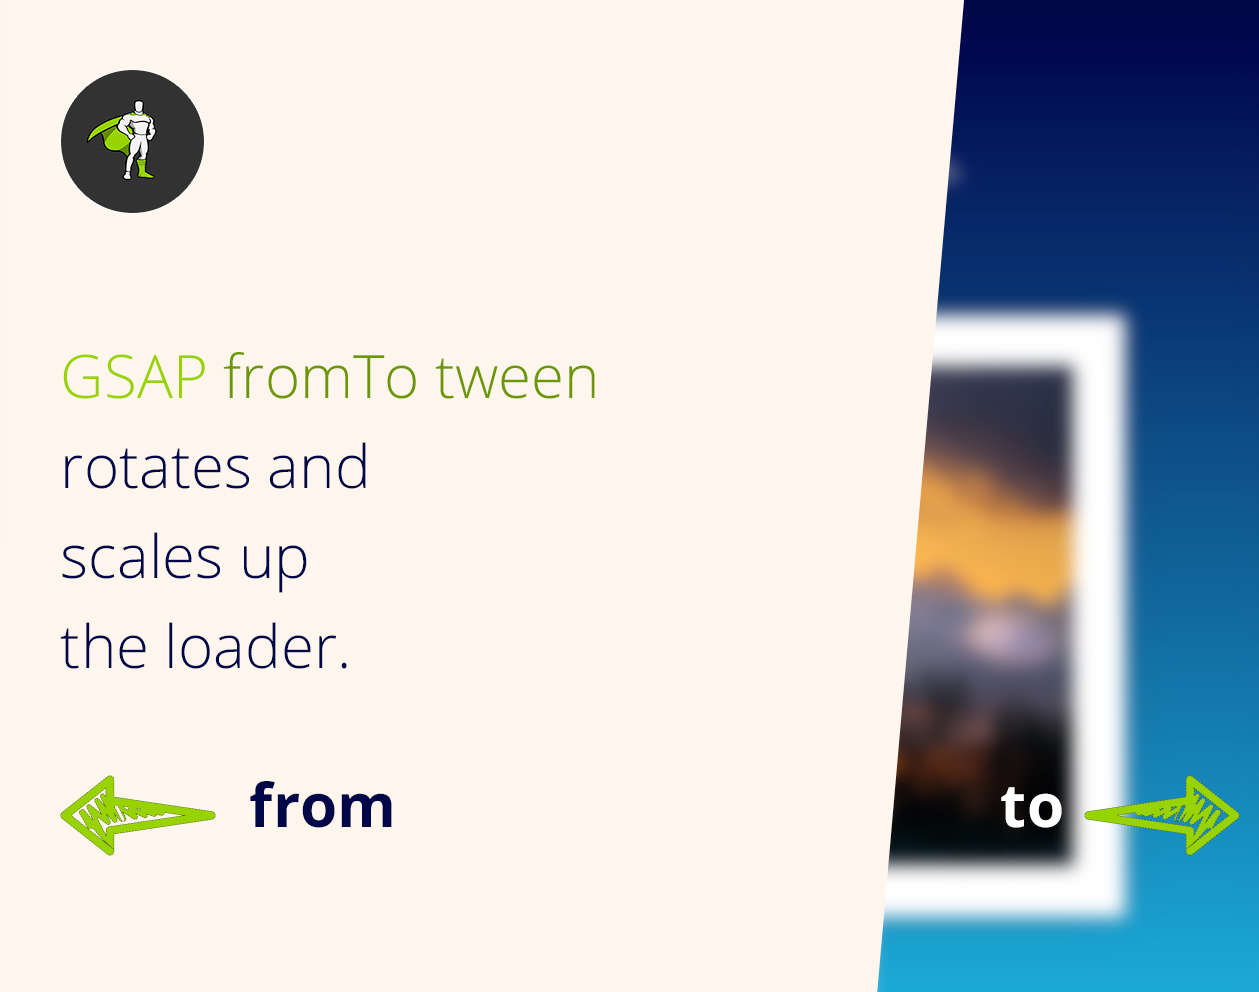
fromTo tween takes care of the first half of transitions and covers the screen when it’s completed.

We are setting the transformOrigin to be 'left center'. This makes it grow from left to right.

Page Transitions Tutorial
function loaderAway() {
    // GSAP tween to hide loading screen
    return gsap.to(loader, { 
        duration: 0.8, 
        scaleX: 0, 
        xPercent: 5, 
        rotation: -10, 
        transformOrigin: 'right center', 
        ease: 'power4.inOut'
    });
}

This tween reveals the new page which was loaded underneath the loader by Barba.js.

By changing the transformOrigin to 'right center' we create the effect of the loader disappearing on the right side of the screen.

6. Before and after the transition

Barba.js also gives you access to specific lifecycle methods or hooks that you can tap into.

One common example would be to add css class to your page to prevent users from double clicking on links.

// do something before the transition starts
barba.hooks.before(() => {
    document.querySelector('html').classList.add('is-transitioning');
});
// do something after the transition finishes
barba.hooks.after(() => {
    document.querySelector('html').classList.remove('is-transitioning');
});
.is-transitioning {
    pointer-events: none;
    cursor: progress;
}

Another example would be to enable scrolling to the top of the newly loaded page. We can use .enter hook for that.

// scroll to the top of the page
barba.hooks.enter(() => {
    window.scrollTo(0, 0);
});

Final Demo

View Demo Download Files

Related Resources

Conclusion

This may have been just a basic example, however I hope you can now see implementing page transitions can be a simple task!

The ultimate key is to master Barba.js and an animation library of your choice. If you’d like to go with GreenSock, learn everything you’ll need to know at GreenSock 101.

Today we really only scratched the surface of page transitions. It is a broad area, with lots of creative options out there.

So, if you have you seen other interesting page transitions you would like to learn about, please let me know! I’d be happy to make more in-depth page transition tutorials.

React + GSAP Workshop

New Courses Survey

I am currently in the planning phase of my new premium courses. Please answer the following questions, so that I can create the ideal course for you.

React Hooks Tutorial for Beginners

React Hooks Tutorial for Beginners

Are you new to React Hooks or would you like to know how to use GreenSock with React?

Then you should definitely understand what React Hooks are and how to use them.

In this React Hooks tutorial will learn:

What are React Hooks?

In short React Hooks let you use state and side effects in a functional components, something what was not possible before.

Before React Hooks were introduced to the world, this would be your workflow:

  1. create a functional (stateless) component
  2. realise that you need to manage an internal state of this component
  3. rewrite this component into a class component
  4. happily manage components state

Now with React Hooks it looks much more streamlined:

  1. create a functional component
  2. happily manage components state

React Hooks let you manage the state and react to state changes in functional components.

You can read more about React Hooks from the official documentation.

Now lets explore the most common state management use cases in React components.

How to manage state with React Hooks?

Imagine that we have a simple React component that needs to be either collapsed or expanded.

import React from 'react';

const Collapsible = () => {
    return (
        <div className="isExpanded">
            <h1>Item title</h1>
            ...
        </div>
    )
}

We would need to rewrite this into a class component if there were no React Hooks.

Luckily we have useState React Hook.

import React, { useState } from 'react';

const Collapsible = () => {

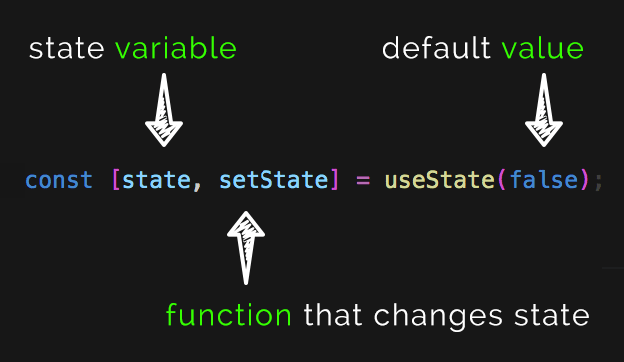
    const [state, setState] = useState(false);

    return (
        <div className={state ? 'isExpanded' : null}>
            <h1>Item title</h1>
            ...
        </div>
    )
}

We are importing useState from React and then creating a default state with the value of false.

Then we have access to the state variable and can render a css class when required.

If we wanted our component to be expanded by default we would set it to true by default.

How to use useState React Hook

state and setState names are customisable names, you could call them whatever you like. color, setColor or user, setUser would do the same thing.

You get the point of sticking to a clear naming here.

state is the name of the stored variable and setState is a function that updates the value of this variable.

To change the value we could add onClick event to the h1 and toggle the value to the opposite true or false.

import React, { useState } from 'react';

const Collapsible = () => {

    const [state, setState] = useState(false);

    return (
        <div className={state ? 'isExpanded' : null}>
            <h1 onClick={() => setState(!state)}>Item title</h1>
            ...
        </div>
    )
}

Now we are managing the internal state of our component using the useState React Hook.

You are not limited to a single value for your state, you can store objects, arrays or even nested objects.

Here is an example of a property object being stored in the state.

const [property, setProperty] = useState({
    name: 'Hotel Heaven',
    id: 'hh123',
    location: 'Collins Street'
});

How to fetch data with React Hooks?

Another React Hook that you will need to master is useEffect().

It hooks into your React component in the same way as componentDidMount, componentDidUpdate, and componentWillUnmount used to.

Here is an example component that fetches Top board games from Board Game Geek.

import React, { useState, useEffect } from 'react';

const TopGames = () => {

    const [games, setGames] = useState([]);

    useEffect(() => {
        fetch("https://bgg-json.azurewebsites.net/hot")
            .then(response => response.json())
            .then(data => setGames(data));
    });

    return (
        <div>
            {
                games.map(game => <p>{game.title}</p>)
            }
        </div>
    )
}

We are importing useEffect React hook and then inside of it we are:

  • fetching data from an external API and
  • saving the response into a local state variable called games

The problem with the above code is that it would create an infinite loop!

The component mounts, we fetch data, the state gets updated, the components updates, we fetch data…and this continues.

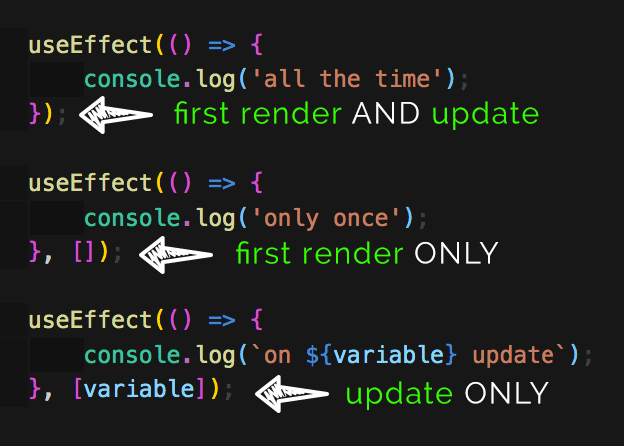
By default useEffect() runs on the first render and on every update.

How to fix the infinite loop inside of useEffect

To make the fetch call only once, we need to supply an empty array as the second parameter.

useEffect(() => {
    fetch("https://bgg-json.azurewebsites.net/hot")
        .then(response => response.json())
        .then(data => setGames(data));
}, []);

This empty array tells React to run the function inside of it only after the first render, not on update.

In another example we could include a searchTerm dependency. This would make sure that the fetch call only happens when the searchTerm variable is updated.

useEffect(() => {
    fetch(`https://someurl.com/api/${searchTerm}`)
        .then(response => response.json())
        .then(data => setGames(data));
}, [searchTerm]);

searchTerm is now a dependency for this side effect and unless searchTerm is updated, the fetch call would not run.

How to use useEffect React Hook

We have mentioned mount and update, but where is the componentWillUnmount()?

If your effect returns a function, it will be executed when it is a time for the component to be unmounted.

useEffect(() => {
    // do something here first
    // then console.log when unmouting
    return (() => {console.log('unmounting now')})
}, []);

This will simply console.log every-time this component gets removed from the DOM.

Conclusion

I hope that this article clarified a lot of your questions about React Hooks.

They are a great addition to the React API, make your code more readable and reusable.

I am currently re-recording my React 101 to include React Hooks, join me there to learn more.

Are you struggling with anything related to React Hooks? Have you tried to use GreenSock with React? Let me know in the comments.

Git merge conflict tutorial

Git merge conflict tutorial

Are Git conflicts your biggest nightmare? Do you freak out when you get a conflict?

I promise that at the end of this Git merge conflict tutorial you will be resolving conflicts without any headaches.

To simplify the merging explanations I will be referring to my-branch and his-branch, but you can substitute them for yours.

What you will learn:

How does Git merge conflict happen?

The merge conflicts happen when someone else edits the same lines of code in his branch as you edit in your branch.

In our example we have colors.txt file in the master branch and both of the other branches have a commit that has changed this file.

// colors.txt

// in master, you have both created a branch from here
red
yellow
blue

// commit in your branch
red
green
blue

// commit in his branch
red
white
blue

Do you see how the same file has a different content in both branches and the same line modified?

This would cause a merge conflict.

1. Clean table

Firstly commit or stash all of your current changes, your branch needs to be “clean” before merging.

Also if you haven’t already, switch to his-branch and pull his latest changes.

// in your branch
// commit or stash changes and switch to his branch
git commit -a -m "some message"
git stash
git checkout his-branch

// in his branch
// pull his changes and switch back to yours branch
git pull
git checkout -

Git clean branch

If you run git status you should see nothing to commit, working tree clean.

Are you new to Git? Checkout also this Git branches tutorial.

2. Git Merge

Now you are ready to merge his branch.

// in your branch
git merge his-branch

This will try to merge all his changes into your branch.

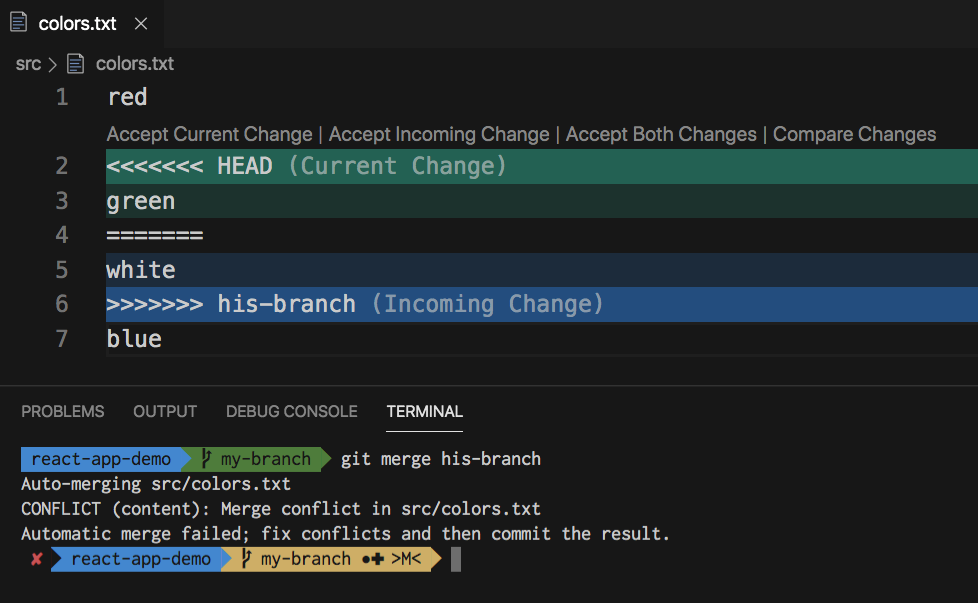
Because you have both modified colors.txt on the same line, you have to resolve this a merge conflict manually.

Git merge conflict

The green block shows your changes and calls them Current change.

The blue block shows his changes in his branch and calls them Incoming changes.

Aborting merge conflicts

If you don’t feel comfortable resolving the conflict you can always abort the merge process.

// in your branch
git merge --abort

This will return you to the state of your repo before you have started the merge process.

3. Resolving Git merge conflict

Resolve Git conflicts options

To resolve the conflict we have 3 options:

  1. Accept current change
  2. Accept incoming change
  3. Accept both changes
// resolved colors.txt

// Accept current change
red
green
blue

// Accept incoming change
red
white
blue

// Accept both changes
red
green
white
blue

This seems to be straight forward on our simple example, but I know it can be overwhelming to look at especially if your merge conflict involves big blocks of code.

One thing that helped me with merge conflicts is to use DIFF3. More on that later.

4. Commit resolved conflict

Based on your scenario pick one of the options above for every conflict and save the file.

If you have more conflicted files you will need to open them and resolve them too.

Once you have resolved all conflicts in all files you will need to stage them and commit.

// stage all files
git add . 
// commit
git commit -m "merged his-branch"

// shorter version of the above
git commit -a -m "merged his-branch"

If everything went well you should see a new commit made on your branch, your working tree clean and the merge process completed.

Git conflict resolved

An easier way to look at merge conflicts

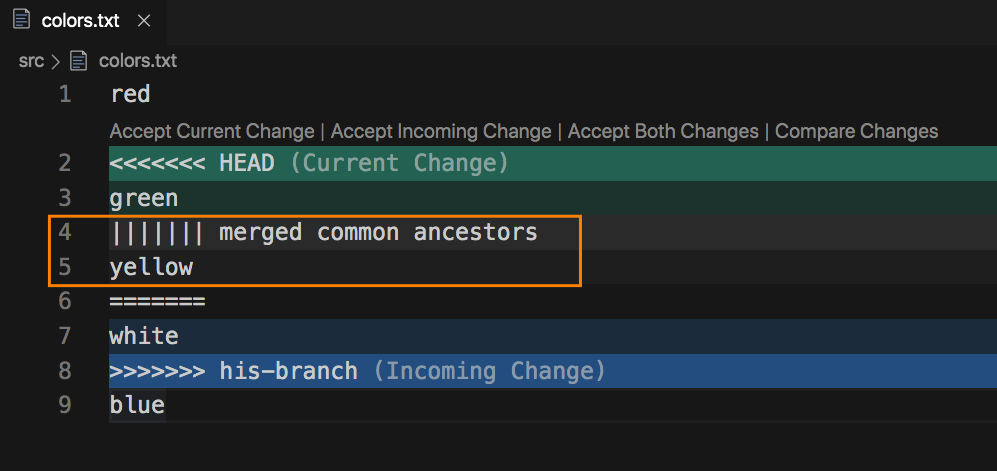
To make it easier to resolve merge conflicts I prefer to use the DIFF3 view.

Git merge diff3

When you enable diff3 you will see a 3 way view.

  • the original version – merged common ancestor
  • current change
  • incoming change

Yellow was the original color, I have changed it to green and he has changed it to white.

To enable Diff3 you need to add it to your Git config.

git config merge.conflictstyle diff3

To find out more about Git config checkout out this Git config tutorial.

Conclusion

Resolving Git conflicts can be very frustrating and stressful situation, but hopefully this Git tutorial gave you a lot more confidence to resolve conflicts in Git.

Do you have any tips or tricks when it comes to resolving Git conflicts? Let me know in the comments.

Git config tutorial

Git Config Tutorial

Have you ever wanted to change the default commit message in Git config?

In this Git config tutorial you will learn:

If you are completely new to Git checkout out the Git Tutorial for Beginners or my complete Git tutorials playlist on Youtube.

Where do you find the Git config files?

The following Git config files locations are Mac specific.

System vs Global vs Local Git config

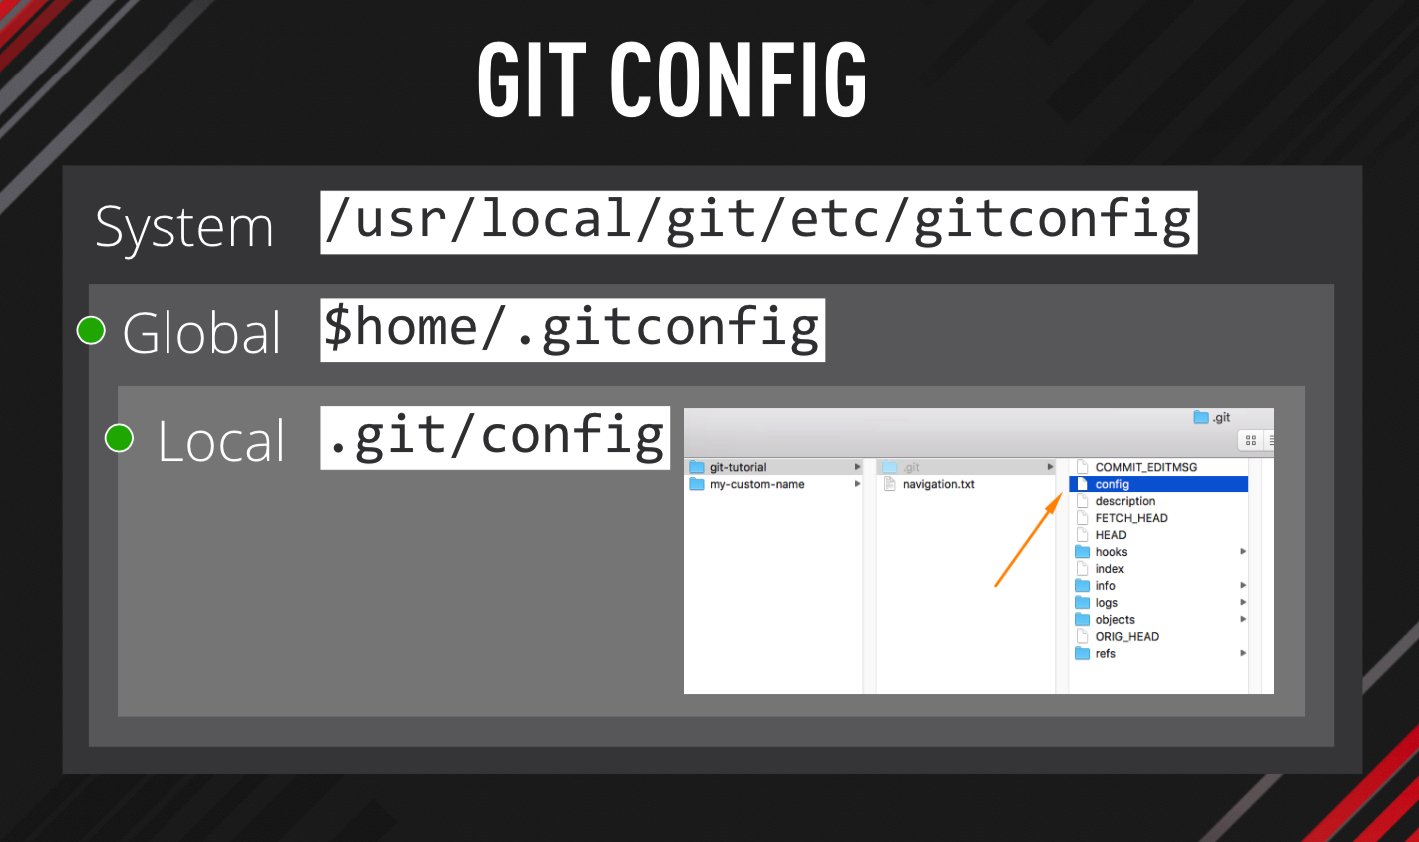
Before we get to the locations, I just want to clarify that there are 3 different scopes for Git config.

System Git config controls settings for all users and all repositories on your computer.

Global Git config controls settings for the currently logged in user and all his repositories.

Local Git config controls settings for a specific repository.

These 3 config files are executed in a cascading order. First the system, then global and finally the local.

That means that your local Git config will always overwrite settings set in the Global or System configs.

Git config tutorial

// System
/usr/local/git/etc

// Global
$home/.gitconfig

// Local
.git/config

In general you most likely want to edit the Global settings and occasionally set some more specific configuration for a single repositories.

Your username and email should be the same for all your repos, that is why it is stored in the Global config.

How do you view your Git config settings?

git config --list
git config --list --system
git config --list --global
git config --list --local

If you don’t specify which of the configs you would like to see, you will get all 3 configs merged into the output in your console.

To edit any of the files use the --edit flag or open the file in a text editor.

How to add or delete a record from Git config?

The following commands would add or remove your name and email from the Global config.

// to add
git config --global user.name "Your Name"
git config --global user.email "[email protected]"

// to remove
git config --global --unset user.name
git config --global --unset user.email

If you want to read a specific record from Git config use: git config user.name.

How to create a custom Git commit message?

Sometimes it is useful to create a template for your commit messages. This keeps your commits consistent.

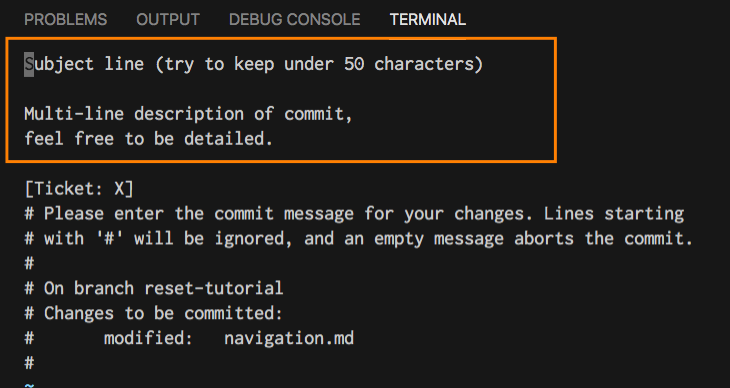
To create custom Git commit message firstly create a text file containing your message.

// example from the official Git documentation
Subject line (try to keep under 50 characters)

Multi-line description of commit,
feel free to be detailed.

[Ticket: X]

Save this file as .gitmessage in your user directory eg. ~/.gitmessage.

Then update the global config to point to the right location.

git config --global commit.template ~/.gitmessage.txt

Now you should see your own custom message when you make a new commit.

Git config tutorial

How to use Git alias?

Git alias is another setting saved in the Git config file. It lets you execute longer Git commands by predefined shortcut.

git config --global alias.last "log -1 HEAD"

If you add the above alias to your Git config you can use git last to access the log of your last commit.

The possibilities are endless.

Have you enjoyed this Git tutorial? You might also like

Conclusion

There is much more to Git config, but hopefully this article made it clear how you can configure your own Git environment.

Let me know in the comments what are your own Git tips and tricks.

Git Cheat Sheet

Git Cheat Sheet – Useful Git commands in one place

In this Git Cheat Sheet, I have put together the most frequently used Git commands for both Git beginners and seasonal professionals.
If you are constantly looking up some common Git commands, or learning Git from scratch this is for you.

Let me know what you think in the comments. Enjoy.

Continue reading

Git reset tutorial

Git Reset Tutorial

Git reset can be quite overwhelming and scary.

If you don’t know what you are doing, things can go horribly wrong and you can lose some of your work.

In this Git reset tutorial you will learn how to undo your changes in all practical scenarios that I could think off.

Table of content

Are you new to Git? Checkout Git tutorial for beginners and Git branches tutorial.

How to unstage changes in Git

Your Scenario:

You are working on your local branch and you have staged 2 files using the git add . command.

Git reset tutorial

How do you now unstage one of the files?

The Answer:

git reset readme.me

git reset readme.me would reset only the specified file and move it to the unstaged changes.

Git reset tutorial

What if you wanted to unstage all changes currently staged?

git reset HEAD

git reset HEAD would move all your staged changes to unstaged.

Git reset tutorial

In other words it moves the HEAD pointer to the last commit, resets the staged area and keeps your changes.

What if you wanted to reset and at the same time also wanted to get rid of your changes?

git reset --hard HEAD

git reset --hard HEAD would reset HEAD to the last commit and trash all your changes. The image below shows that the readme.md file has been deleted after the hard reset.

Git reset tutorial

How to revert file to a specific commit

Your Scenario:

You are working on your local branch and you have already created a few commits but you want to revert file to a specific commit.

Git reset tutorial

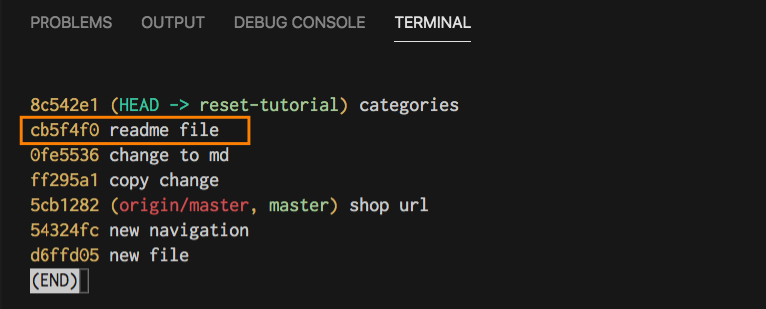
Firstly you need to find out the hash ID of the commit, run the git log --pretty=oneline command.

Git reset tutorial

Pick a commit that contains the desired version of your file.

If you are not sure which commits contains the changes you are after, use the git diff command.

git checkout cb5f4f0 navigation.md

git checkout cb5f4f0 navigation.md would checkout this file and place it in your staged area.

Git reset tutorial

What if you only want to get a specific changes from this file?

You can choose what to bring back by adding -p and patch your working directory.

git checkout cb5f4f0 navigation.md -p

More on that in the next section.

How to manually edit Git changes

Your Scenario:

You need to revert changes in one of your files, but you want to choose which lines of code to bring back.

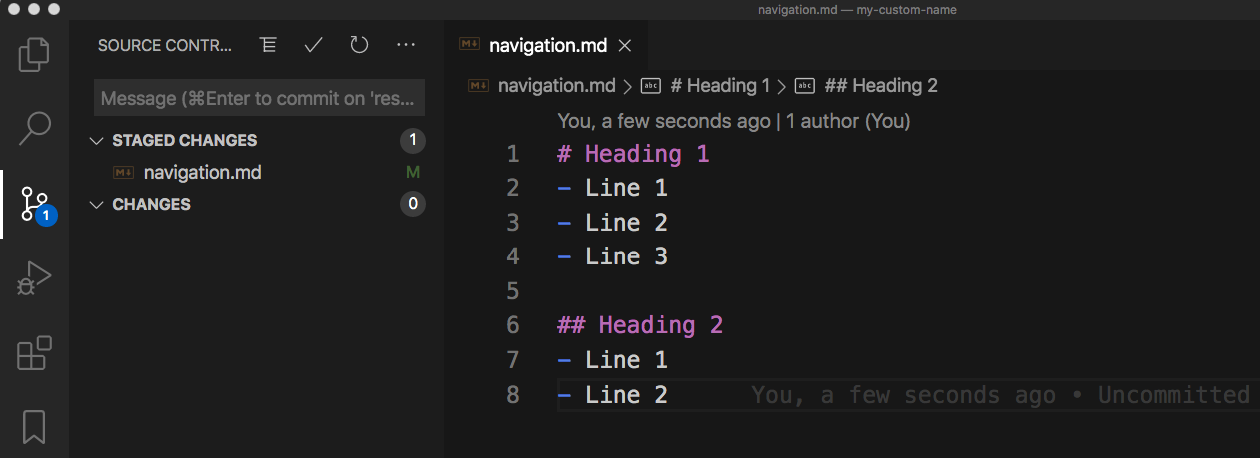
Git reset tutorial

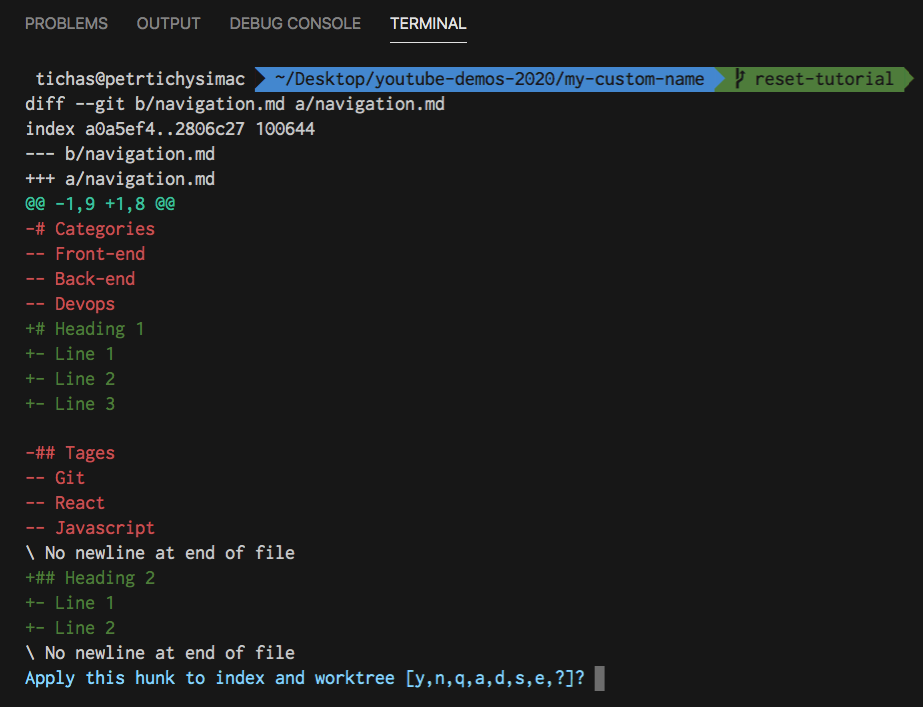
You get a few options when you specify the -p flag:

  • y yes, bring these changes
  • n no, don’t bring changes
  • q quit and don’t bring any changes. It’s like no but for all files.
  • a stage this change and all other changes
  • d do not stage this change or any other changes in the file
  • s split the current change into smaller
  • e edit manually the current change

s will split a bigger change into smaller ones, this makes it easier to edit.

e will enter a manual mode, where you can choose which lines to bring and which ones not.

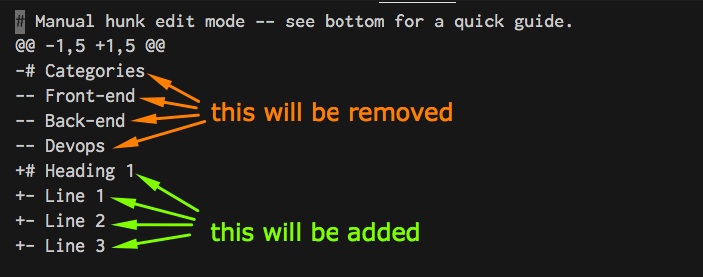
To enter the editing mode you need to press i for insert, now you are able to navigate through the changes.

Git reset tutorial

The lines marked with minus - at the start would be removed if we bring this change into our current version of the file.

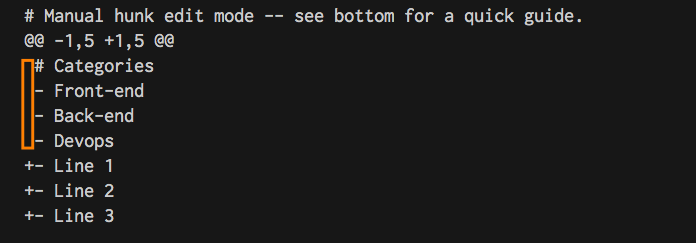
To ignore removing these lines, simply delete - and replace it with an empty space .

The lines marked with plus + will be added to our current version of the file.

To prevent these lines from being included in the change, we can remove them and they will be ignored .

Here are the changes edited. We want to keep the Categories and 3 bullet points and only bring in Line 1, Line 2 and Line 3.

Git reset tutorial

Adding Heading 1 back to our file will be ignored, because we have manually deleted this line.

To quit the edit mode press Esc and type in :wq and hit enter. w for write, q for quit.

To quit without editing type :q + enter.

Below is the file patched with the recovered code from our previous commit.

Git reset tutorial

Have you enjoyed this Git tutorial? You might also like

Conclusion

If you have enjoyed this article you might also like Git tutorial for beginners and Git branches tutorial.

What is the most confusing Git feature that you would like to see explained in my future tutorials?

Let me know in the comments below.

Git Branches Explained

Git Branches Tutorial

Git branches are one of the best features of Git version control and this tutorial will show you how to manage them.

Git branching model is incredibly lightweight, cheap and fast, regardless of how large your project is.

Git also encourages creating a new feature branches and merging them back to the default branch often.

In this tutorial we will learn:

Are you new to Git? Checkout out the Git tutorial for beginners first.

What is Git branch?

Git Branches Tutorial

Git branch is a pointer called HEAD that points to a snapshot of your changes.

Git init creates the first initial default branch on every projects and calls it the master.

Nobody bothers changing it, that is why you see almost all projects having one master branch.

All other newly created branches are usually referred to as feature branches.

Where does Git branch fit in your development workflow?

Git Branch Tutorial

Imagine that your team is working on an existing web based application.

The team decides which new features they want to implement – new navigation and fix the login form.

They will create tasks in Jira or similar project tracking software.

2 developers could start working on both tasks directly in master, but committing changes could make the master unstable and merging conflicts with other developers would be a nightmare.

Much easier approach would be to create two branches, one for each task.

// feature branch for new navigation
features/[TASK-ID]-new-navigation

// bug fix for the login form
bugfixes/[TASK-ID]-login-form

This links the branch to a specific task Id that your team is trying to implement.

It also lets multiple developers to work on a different tasks independently without making the master branch unstable.

When the task is completed, a new pull request (PR) is raised, tested and reviewed by other developers before merging the branch into master. More on PRs later.

To protect the code in master even more, you can set the number of required PR approvals that suits your team and the project size.

This is a very common workflow on all Git based projects.

How to create Git branch?

To create a branch is simple.

git branch features/abc-123-new-navigation

This will only create the Git branch but it will not switch to it, you will still be on master. Run git log --oneline to see.

Create Git Branch

To use our new branch we need to check it out.

git checkout features/abc-123-new-navigation

Now we have switched to our feature branch and we could start working on the new navigation task.

How to switch to Git branch

We could use a shortcut to do both create and checkout in one command.

git checkout -b features/abc-123-new-navigation

Git log now shows that the HEAD pointer is pointing to our new branch.

If you are using VSCode you would also see the branch name in the bottom left too.

How to switch to Git branch

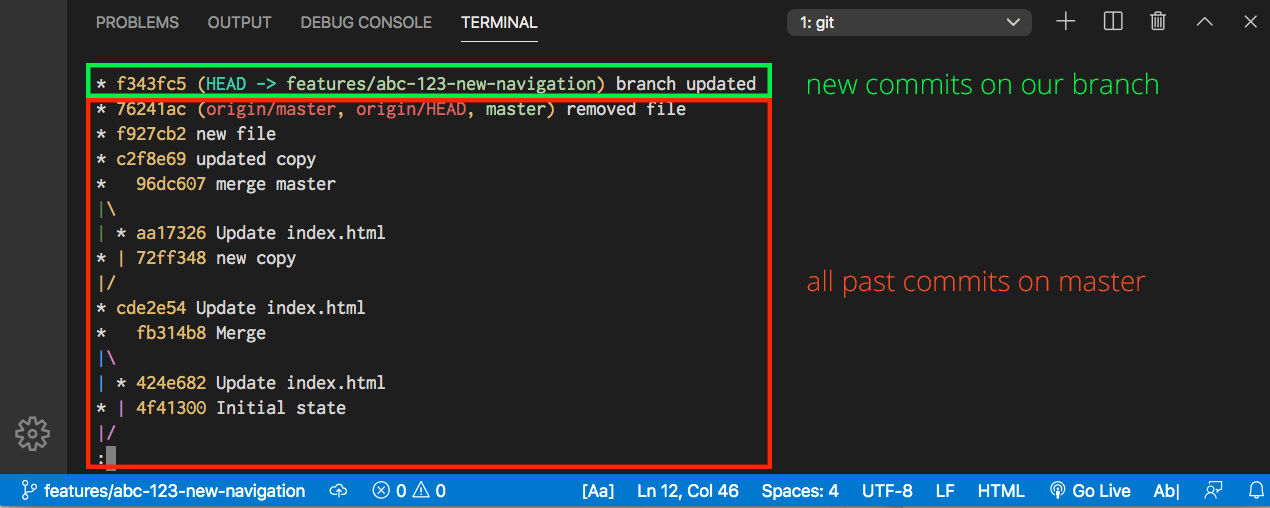
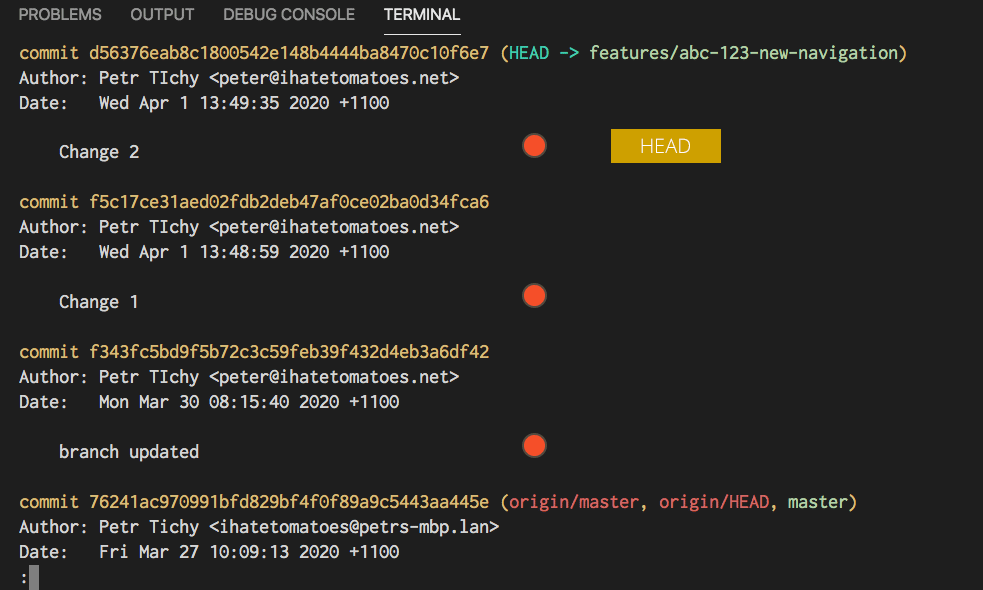
After making a new commit on our new branch the log would look something like this:

How to switch to Git branch

All new commits will be created on our branch.

To switch quickly to the last branch you were on use:

git checkout -

This is a very handy command to quickly switch between master and your feature branch.

Local branch vs remote branch

Above we have created a new feature branch, but all our changes are only saved in our local repository.

If we needed any help from other developers we would need to push our brach to the remote repo for them to checkout.

git push origin features/abc-123-new-navigation

We have now pushed our branch and it will be available for others to checkout.

origin is the default name of the remote repository destination created automatically by Git.

How to merge Git branches?

How to merge Git branch

I will explain how to merge directly from branch to branch without the need of PR approvals.

Git branches

Above is a history with git log that shows 3 commits on our feature branch.

Firstly checkout the branch you want to merge into.

git checkout master

It switches your working directory to master.

Then we can merge our feature branch into master like this:

git merge features/abc-123-new-navigation

If there are no conflicts, master branch would now contain all your changes and commits made on your feature branch.

If there are some conflicts, you can learn how to resolve them here.

You can delete unused branch manually.

git branch -d features/abc-123-new-navigation

Some platforms such as Bitbucket let you automatically delete a branch after you successfully merge your pull request.

Here is an example how to delete a branch on the server.

git push origin --delete features/abc-123-new-navigation

Managing Git branches

We have created, merged and deleted a branch, but what if we want to see a list of all branches?

git branch

// output
* master
features/abc-123-new-navigation

Git branch command will list all your available branches and the * highlights the currently checked out branch.

To see the last commit on each branch use this command:

git branch -v

// output
* master                        76241ac removed file
features/abc-123-new-navigation 5e943bb Change 1

To filter the list of branches based on whether they were already merged or not:

git branches --no-merged 
git branches --merged 

What if we wanted to rename a brach? There is a command for that too 🙂

git branch -m OLD-NAME NEW-NAME
// or
git branch --move OLD-NAME NEW-NAME

Git fetch vs Git pull

What is the difference between pull and fetch?

Git fetch will fetch all changes on the server that you currently don’t have.

It will check the server and send you information about new commits and branches. It will not modify your working directory.

Git pull however will fetch the changes and also merge them to your current working directory.

It will do git-fetch and git-merge in one single command.

Conclusion

Git branches are very handy concept and can definitely speed up your web development workflow a lot.

Now you know how to manage your Git branches.

Do you use Git branches on your projects? Do you have some handy tips that you would like to share with us?

Let me know in the comments.